Google
 

July 31, 2008

Paneer Rolls


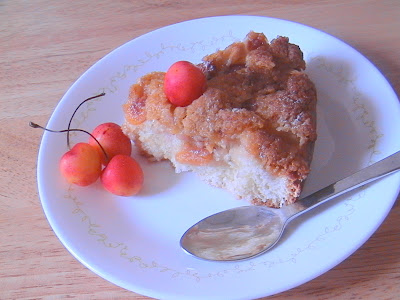
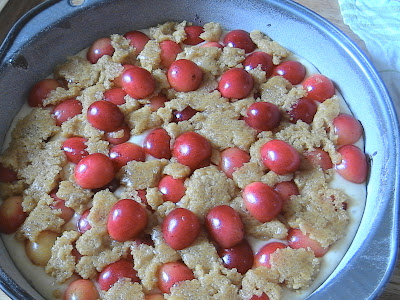
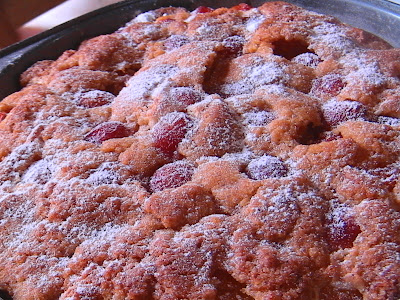
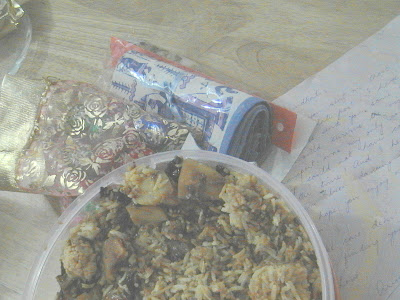
It is about a year since I overcame my fear of Mr. Yeast. We have been good friends now and although I haven’t really baked breads that much, I make pizzas and buns very often. I had wanted to recreate the paneer rolls that I’ve grown up eating at Hot Breads and a recent visit to Bisque (which was Hot Breads, Gurgaon until recently) reminded me of what I’d almost forgotten. S and I shared a mushroom roll that evening and I thought to myself, “I can make this.” And that’s exactly what I did. But I spiced up my bread a little and Indianised it!


Ingredients:

For the dough:

1 cup Flour
1/2 cup Whole Wheat Flour
1 1/2 tbsp Oil
1 1/2 tbsp Yeast
1 1/2 tbsp Sugar

3/4 tsp Salt
1/4 cup Boiling water
1/4 cup Milk
½ tsp Cumin-Coriander Powder
1/4 tsp Turmeric Powder
1/2 tsp Chilli Powder


For the filling:
1/2 cup Paneer Cubes
2 Onions, sliced
1 tsp Ginger-Garlic Paste
1-2 tbsp Oil
1 tsp Cumin Powder
1 tsp Coriander Powder
1/2 tsp Garam Masala
1 tsp Chilli Powder
1 tsp Turmeric Powder
Salt to Taste

For the Topping:

1 tbsp Sesame Seeds

For the dough:

Take a huge mixing bowl and place the oil, salt and sugar in it. Add boiling water and mix until the sugar dissolves. Add the milk now to bring the mixture to room temperature. Add the yeast and mix well. Add the flours, cumin-coriander, turmeric and chilli powders and knead into dough. Place the dough in a greased vessel and cover it with a damp muslin cloth. Allow to rise until double in size (roughly 45-50 minutes).


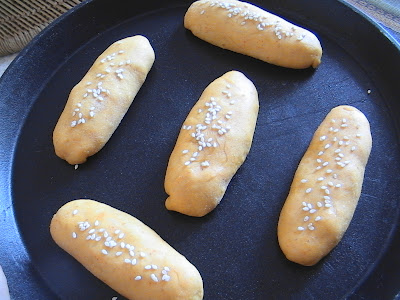
Knead the dough for a minute and then divide into 10 equal portions.

For the filling:


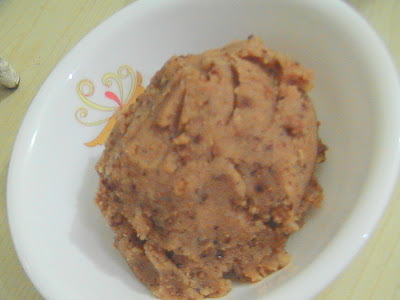
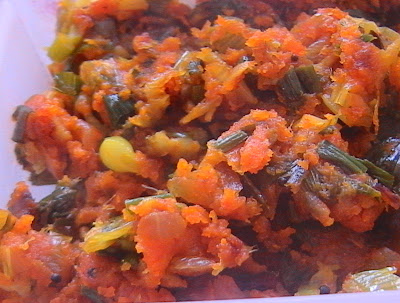
Heat the oil in a kadhai and fry the onions along with the ginger-garlic paste. Fry this for a bit. Add the spices and salt and fry for 1-2 more minutes. Add the paneer cubes. Cover and cook for 2-3 minutes.


To Proceed:


Preheat the oven to 400F.


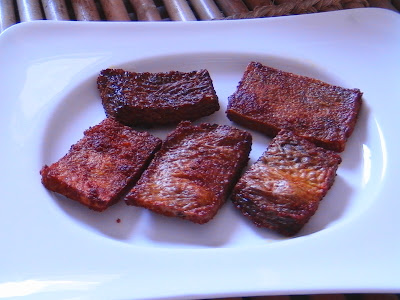
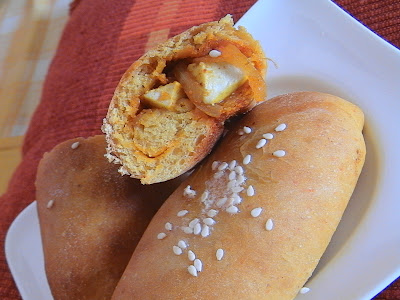
Take a portion of the dough and spread it into an oval shape. Place some stuffing along the centre and bring the edges and seal. Roll in the sesame seeds and place on a greased baking sheet or tray. Repeat with the other portions.Allow to rise for 50-60 minutes and then bake for 12-15 minutes.


I made 8 rolls and thought I could stash some away. My grand plans were thwarted when S said, “Char hi banaye kya tumne? (Did you make only 4?)” I brought the other 4 out and they were gone in no time at all. I am sending these paneer rolls to Aparna of My Diverse Kitchen for Bread Baking Day # 12.


This month has been a bad one in terms of my participation in food blogging events. I usually never miss out on JFI and AFAM. This time, the choice of ingredient for JFI was a little unusual and I wanted to make something, I couldn’t get around to it. I didn’t get a chance to visit the supermarket to buy any avocados, so the AFAM got ruled out too. But I did participate in what I now consider the mother of all food blogging events. The NaBloPoMo challenge. I joined it without knowing what sort of a commitment I was getting into. I was fine until the last week. I almost thought I would have to drop out and told Anita as much over the phone. We joked that in the last week I would just upload random photographs of food without as much as writing a single word. I am glad I have reached the finish line. Three days ago, I had the feeling of “so near yet so far”. Today, I am elated. I ran the recipe marathon with which now feels like a half marathon. I thought then that15 days would be too much to handle and jumped at the idea of NaBloPoMo when Siri suggested it. 31 days of non stop blogging. And finally I stop to catch my breath.

July 30, 2008

Cherry Crumble Cake


I spent 12 years at one school. I have the fondest memories of school. I have had some trying times, but they simply added to the overall experience. Several of my classmates changed every year because of the nature of their parents’ jobs. I was accustomed to seeing new faces each year (or sometimes even the middle of a class year). And although I was waiting for college to start, I was very apprehensive about what it would be like. There are some snobs I keep meeting who consider my college the most conservative and boring place, but I had this one friend who told me I would be comfortable in that environment.


Friends


I had grown up in a co-ed environment. Most of my friends from school are guys. I didn’t know how I would react to being in an all-girls’ environment. But when I stepped into my classroom, I saw a few faces that made me feel at home. I had never met them before, but I was certain that some of them would become my friends.

Image hosted by Photobucket.com


14 years later, I count them among a few of the constants in my life. I know now what it means to be able to take someone for granted. To know that regardless of what lemons life throws your way, these friends will be the first to bring out the tequila and salt. Despite each one being in a different corner of the world, each one leading a life that is extremely different from the other, we are in touch almost on a daily basis.


Today is the birthday of one of these girls. My dearest friend Sujatha. Hers was the first birthday we celebrated in college as it was immediately after we started college. While we all parted ways after graduation, Sujatha and I landed up at the same university for our Masters'. And in the same hostel, with just a room between us. That meant two more years of tete-a-tetes, two more years of (longer) bus journeys, two more years of fun. But more than all of that, it was two more years of comfort. Of having a known and trusted face just a shout away. I understand the importance of all that more today than I did 11 years ago. I woke her up at midnight today just as I did in the hostel 11 years ago (and just as I have for all the years in between). But I had to wish her here as well. This cherry crumble cake seems ideal for the party.


2 cups Flour

6 tbsp Oil

¾ cup Sugar

3 tsp Baking Powder

1 Egg, beaten

2/3 cup Milk

2 cups Cherries, pitted and halved


For the Topping:

¼ cup Butter

½ cup Brown Sugar

½ cup Flour


1 tbsp Icing Sugar for dusting


Grease and line two 8-inch cake tins. Mix together the ingredients for the topping.


Mix the flour, baking powder, and sugar together. Add the oil, milk and beaten egg and whisk together. Divide the batter between the two cake tins. Arrange the cherries on top of the batter and sprinkle the topping over the fruit layer.


Bake at 350F for 30-35 minutes or until a skewer inserted in the cake comes out clean.
Dust with icing sugar and serve.


Outside of eating cherries straight out of the bowl, this has to be the best way to enjoy these summer fruits. Happy Birthday Sujju. May you get the best that life has to offer as anything less just won't do.

July 29, 2008

Instant Potato Podimas


One evening I was in a great mood to experiment. I had found the perfect recipe to use up my green tomatoes. So I made it to go along with some plain rice. Since it was a Friday night, I thought that just one dish, that too a chutney, and rice wasn’t going to make the cut. But, then again, it was a Friday. I didn’t have the patience to stand and cook an elaborate meal. I stood in the kitchen and looked all around. And then I found what I needed. Sitting amongst a whole host of unopened pasta packets was this packet of Aloo Mash. I didn’t know what to make. Cutlets… too much effort. Plus who wants to deep fry (or even shallow fry) anything in the middle of July! Plus I already had rice and chutney. Finally, I decided to make Potato Podimas. I’ll admit this came nowhere close to cooked and grated potatoes. But, in a pinch, it will more than just fly.


1 cup Aloo Mash
2 Red Chillies
2 tbsp Urad Dal
2 tbsp Chana Dal
1/4 tsp Asafoetida
Salt to Taste
a few drops Oil


Heat the oil and roast the urad and chana dals. Add the red chillies and the asafoetida. Cool completely and grind to a powder.


Mix 1 cup of water with the Aloo Mash and mix together until you are left with something that resembles “mashed potatoes”.


Place the powder on a large plate and add the mashed potato mixture. Add salt and mix thoroughly. Enjoy this with hot rice or as a side dish with rice and
sambar.

July 28, 2008

Corn Methi Pulao


There was a time when I only made rice for lunch. Pasta at times maybe. But no rotis. S didn't have a microwave at work and so couldn't heat his lunch. I only made stuff that would taste good at room temperature. Ever since his office got a microwave, I started saving rice for our weekend meals. But I found that these pulaos were almost forgotten. Rice on the weekend meant a full meal that we didn't have time for during the week. Now, I make a pulao at lease once a week to take to work.


1 cup Basmati Rice, washed, soaked and drained

5-6 Peppercorns

1" tick Cinnamon

2 Cloves

2 pods Cardamom

2 Onions, sliced

1 cup Fenugreek Leaves, chopped

1/2 cup Corn

1/4 tsp Turmeric Powder

2 tbsp Oil

Salt to taste


Heat the oil in a pressure pan. Add the pepper, cinnamon, cloves and cardamom. Add the onions and fry for 2 minutes. Add the fenugreek leaves, corn and turmeric powder and saute for a few minutes. Add the rice, salt and 2 cups of hot water. Pressure cook for 8 minutes or 2 whistles. When done, fluff with a fork.


This is a relatively bland pulao and I serve it with any sort of spicy raita. This is a great party dish and also makes for a lazy Sunday lunch.

July 27, 2008

Yam Fritters

Yam. It was the one vegetable my brother really hated. Or rather claimed he was allergic to. One day Amma made yam cutlets that he gorged on. Ever since, I always tell him to just say he doesn't like the vegetable. The allergy tstory doesn't make the cut. I, on the other hand, have been rather indifferent to this. I'd be lying if I said I loved it. And I definitely don't hate it. Amma makes a vadakkal with it and I really like it.


I'd not known yam fritters. My senior from University treated me to this when I visited her a few years ago. I relished it. I bought some yam and called her just to find out how it was made. She told me to marinate the yam pieces and then dry them in the sun. I didn't have that much time. So I baked them in my oven and then shalow fried them.

(One point to note is that shallow or deep fried yam tends to smell like fish!)

1/4 cup Yam slices
1 tsp Turmeric Powder
1 tsp Chilli Powder
1/4 tsp Asafoetida
Salt to taste
Oil for frying

Mix the turmeric powder, chilli powder, asafoetida and salt. Apply this to the yam slices. Bake in a moderately hot oven (325F) for 35-40 minutes.

Heat a skillet or a frying pan and shallow fry the yam pieces using a little oil. Cook evenly on both sides.

I had this with some rice and dal at her place the first time I had it. I made it to go with some rice and sambar for a Sunday lunch. Perfectly spicy, perfectly crunchy. Just what you need to make your meal complete!

July 26, 2008

Mushroom-Garlic Souffle

Souffles. I've always been drawn to them. I've liked both savoury and sweet versions. I made these mushroom-garlic individual souffles sometime ago. Light and fluffy, these little beauties are perfect appetizers. I haven't made these for any big party. But they're perfect for that small intimate diner for two!


4 tbsp Butter

1 cup Mushrooms, chopped

2 tsp Lime Juice

2 cloves Garlic, crushed

2 tbsp Mixed Herbs

2 tbsp Flour

1 cup Milk

2 Eggs, separated

Salt and Pepper to taste

Grease 4 ramekin cups with a little butter.

Melt about 2 tablespoons of butter in a skillet. Add the mushrooms, garlic and the lime juice and fry for about 2-3 minutes. Transfer the mushroom mixture to a different bowl. Stir in the mixed herbs.

Melt the remaining butter in a pan and add the flour and fry for a minute. Stir in the milk and boil until it thickens. Mix this white sauce into the mushroom mixture. Add the egg yolks, salt and pepper and beat well.

In a separate bowl, whisk the egg whites until they form peaks and stir this into the mushroom mixture. Mix well.

Divide this mixture into the ramekin cups and bake for 10 minutes at 400F. Do not overbake the souffles are they may turn rubbery. The souffles are done when a skewer inserted into them comes out clean. Serve immediately or they may tend to go flat.

July 25, 2008

Mixed Bean Soup


I've talked about how I'm on my way to soon becoming Ms. Bean! One of the things that I made recently was this: Bean Cutlets. I had some mixed beans leftover from this exercise and decided to try out this soup. It tasted more like a not-so-spicy Indian bean dish than a soup. But we had it with some toast and it felt like a full meal for S and like a soup for me!


1 1/2 cups Mixed Beans, soaked and cooked

1 tbsp Oil

1 Onion, sliced

1/2 cup Potato, diced

1 Carrot, chopped

1 tsp Green Chilli Paste

1 tsp Garlic Paste

1/2 tsp Coriander Powder

1 tsp Chilli Powder

3 cups Water

Salt and pepper to taste


Heat the oil in a pan. add the onion, potato and carrot and saute for 2-3 minutes. Add the chilli and garlic pastes and cook for another minute. Add the coriander powder, chilli powder and the water. Bring this mixture to a boil and cook for 20 minutes. Stir in the mixed beans and season with salt and pepper.


My beans were mashed earlier and I think this soup is likely to taste much better with the cooked beans left whole.

July 24, 2008

Masala Tendli-Vangi Bhat


I can eat any amount of Brinjal. And I think I can safely say that S can eat any amount of Ivy Gourd(Tendli/Dondekai/Kovakkai/Kundru). Fortunately, it is not as though we dislike what the other adores. And this recipe is a perfect lunchbox item for the two of us. Little treats for both of us, and just one item to make and pack.


I don't even remember where I got this recipe from. I've been making this in summer as it is a nice variation from the usual roti-sabzi routine.


1 cup Basmati Rice, washed and soaked

1/2 cup Brinjal, diced

1/2 cup Ivy Gourd, sliced

1/4 tsp Asafoetida

1/2 tsp Ginger Paste

1/2 tsp Turmeric Powder

1/2 tsp Cumin Seeds

2 Medium Onions, chopped

1 tsp Green Chilli Paste

1 tsp Oil

1 tsp Cumin Coriander Powder

1/2 tsp Pepper

1/4 tsp Clove Powder

Salt to taste


Heat oil in a pressure pan and add the asafotida, ginger paste, turmeric powder and cumin seeds. When the cumin sees crackle, add the onions and green chilli paste and fry for 4-5 minutes. Add the ivy gourd and the brinjal pieces. Drain the rice and add this to the vegetable mixture. Add the cumin coriander powder, pepper and the clove powder along with the salt. Add 2 cups of hot water and pressure cook for 10 minutes or 3 whistles.


Serve with some curd or raita on the side.


This makes for a great Sunday lunch too. Not too much effort, but a great resultant dish. What more can one ask for?

July 23, 2008

Garlic Bread

One of the things I love about dining in at Pizza Hut is the garlic bread that they serve. I don't like it when it is delivered. It tends to get a litle soggy by the time it arrives. The only time I eat it is when we eat at the restaurant (which isn' often). Now, when I want to eat garlic bread, I make it at home.


8 slices of a Baguette, lightly toasted
3 tbsp Olive Oil

1 tsp Garlic Paste
2 tsp Red Chilli Flakes
1 tbsp Mixed Herbs
2 tbsp Cheese Powder
Salt to taste

Mix the red chilli flakes, garlic paste, salt and mixed herbs with the olive oil and keep aside for 5-10 minutes. Brush the toasted slices with the olive oil mixture and sprinkle the cheese powder over them. Bake in a hot oven (450F) for 10 minutes.


I made this garlic bread to go with the corn and vegetable chowder. It tastes great with the soup, but I also like this with pasta or on its own, as a snack.

July 22, 2008

Vegetable and Corn Chowder


I love soups. At my parents' place, soup and crackers or soup and toast was a dinner staple. My friends and colleagues have mde fun of me endlessly for eating a bowl of soup for dinner. I make soups very rarely here as S is also not for soup alone for dinner. So this is an occasional indulgence. This soup sort of walks the middle path. It is soup, but it is chunky. It pleases both of us.


I found this recipe in the same book (Favorite Vegetarian Dishes) that I found Grilled Garlic Potato Wedges, Garlic And Sage Bread, Pumpkin Soup, Middle Eastern Salad, Potato Mushroom Cakes and Punjabi Kadhi Pakoda. I had to modify it as I didn't have everything the recipe called for.


1 tbsp Oil

1 Onion, chopped

1 Red Pepper, chopped

2-3 cloves Garlic, crushed

1 Potato, diced

2 tbsp Flour

2 cups Milk

1 cup Water

8-10 Broccoli florets

1 cup Corn

1/4 cup Cheddar Cheese, grated

Salt and Pepper to taste


Heat the oil in a pan and add the onion, red pepper, garlic and potato. Saute for 2-3 minutes over a low flame. Add the flour and fry for about a minute. Add he milk and water along with the broccoli and corn. Bring this mixture to a boil and then coninue to cook for aout 15-20 minutes. Stir in the cheese and season with salt and pepper.


I served this with some chunky garlic bread. Recipe coming up very soon.

July 21, 2008

Rasagulla Sabzi


Rasagullas! The word brings back memories of St. Mark's Road and KC Das. I can't say that I've always loved this Bengali creation. My absolute favourite is the Rasamalai and I'd think the Sandesh comes a close second.


But at one time, rasagullas weren't as easily available. I had seen this recipe for Rasagulla Sabzi in one of Tarla Dalal's earlier books. I was probably 13 or so and I told Amma I wanted to make this. For a change, she must have thought I was crazy. We got to eat good rasagullas about once a year (in a good year!) and imagine making a side dish with those instead of relishing them as they were.


Sometime back, we found some rasagulla tins on a BOGOF sale. So we reurned home with two tins. If you've noticed, we're not big on Indian sweets. This was the perfect situation to be in. I remembered this recipe and set out to make it, from memory. It turned out to be too spicy for my liking. I will tone it down the next time I make it. But make it again I will.


6 Rasagullas

1/4 cup Tomato Puree

1/4 cup Milk

2 tsp Oil

Salt to taste


For the masala (grind to a paste)

1 Onion

4 Red Chillies

1" piece Ginger

1" stick Cinnamon

2 pods Cardamoms

2 Cloves

1 tsp Cumin Seeds

1 tsp Coriander Seeds

3 cloves Garlic

2 Green Chillies

1/4 tsp Turmeric Powder


Squeeze the rasagullas to remove the sugar syrup. Soak them in plain water and keep aside.

Heat the oil in a kadhai. Add the ground masala and fry for 5-7 minutes. Add the tomato puree, milk, salt and a little water (about 1/4 cup). Bring to a boil over a low flame and cook for 10 minutes.


Squeeze the water from the rasagullas and add these to the gravy. Serve with rotis or parathas.

July 20, 2008

Methi Thepla


Amma came across this recipe some 10-12 years ago on a Sanjeev Kapoor show. I was at the hostel then and when I went home one weekend, she made these along with a creamy mushroom curry. While, I don't get to eat that mushroom curry much these days, the thepla is a standard feature. And I love it best with this sweet and spicy Gujarati Gorkeri pickle. I haven't bothered to get the exact recipe from Amma or from Sanjeev Kapoor's book. (I'm fairly certain it is in there!), I only know the ingredients.


1 cup Wheat Flour
1/2 cup Besan
1 Ripe Banana, mashed
1 tsp Green Chilli paste
1/2 tsp Ginger paste
1/2 tsp Garlic Paste
1 tsp Cumin-Coriander Powder
1/4 tsp Turmeric powder
1/2 tsp Chilli Powder
1 cup Fenugreek Leaves, chopped
1/2 cup Curd
1/4 tsp Asafoetida
Salt to taste
1 tbsp Oil + oil for frying

Mix all the ingredients, except the oil for frying, together and knead into a dough, adding a litle water if necessary. Allow this to sit for about 15 minutes. Divide the dough into small balls and roll each into a chapati. Heat a tawa and toast evenly on both sides using a little oil. I'd recommend about a half a minute a side on a moderately hot tawa.

The banana offsets the bitterness of the fenugreek and he resulting thepla is not sweet not bitter. This is great for brekfast, lunch, dinner or any of those in between times!

July 19, 2008

Hara Bhara Paneer


Depending on what time of the day we go shopping for vegetables, we come back with varying amounts of fresh coriander. If we’re the last customers of the day, I think “Uncle”, as S and I call him, would give us as much coriander as the other vegetables we’ve just bought from him. While it looks pretty and I’m super excited with my freebie, I have no clue how to use up these greens. Most folks at work tell me to make chutney out of this. But there’s a limit to how much chutney we can consume. I once made it and spiced up this colour coordinated salad. The next time I made the chutney, I put on my experimenter’s hat and ended up with this dish.

1 cup Paneer Cubes
1 cup Coriander Leaves
2 pods Garlic
1" piece Ginger
2 Green Chillies
Salt to taste
1 tsp Oil + Oil for shallow frying
1 tsp Cumin Seeds
¼ tsp Asafoetida


Prepare the chutney by grinding the coriander leaves with the garlic, ginger, green chillies and salt together.

Heat a skillet. Toast/shallow fry the paneer cubes on this using a few drops of oil. Keep aside.

Heat the teaspoon of oil and add the cumin seeds and the asafoetida. When the cumin crackles, add the chutney and fry for 3-4 minutes. Add the paneer cubes and mix well. Cover and cook for 2-3 minutes.

Serve as a side with rotis or between slices of bread as a toasted sandwich. It tastes great whichever way you eat it.

July 18, 2008

Gawarfali ki Sabzi


This summer I resolved to try out the summer vegetables that show up in every market I visit. While I always ate all vegetables and cleaned my plate without as much as a whimper, there are vegetables that I dislike. Tinda is one of them. But I bought it, made it, and guess what, ate it too. Likewise, I bought cluster beans and yard long beans, snake gourd and bottle gourd, and everything else that summer threw at me. What worried me was the fact that if I didn’t make certain vegetables, I could no longer retain my title of “not-at-all-picky eater”. Moreover, if and when I have children, I figured my likes and dislikes should not govern their meals. If I forget about a certain vegetable over time, by the time I have children, I might have erased memories of some vegetables from my brain completely. Now that I have a blog, I can cook these vegetables, enjoy them in different ways and save them here for eternity.


Cluster beans (known as Gawarfali in Hindi, Mitkesaang in Konkani, Kotthavarangai in Tamil, Mattikaya in Telugu) happen to be the variety of beans that takes the longest to cook. Appa’s grandmother used to call it, “Avasarathukku edhiri” (loosely translated as the enemy of emergency/urgency). I have learnt that the best way to cook these is in my pressure cooker. Amma cooks them in advance and freezes them so that she can use them at a moment’s notice.


I came across this recipe in Tarla Dalal’s Rajasthani Cookbook and modified it immediately and set to work. (My system is not ready yet for the heat of Rajasthani food and given some health problems I had recently, I am sure it never will be.) It helped that I’d cleaned, strung and chopped the beans earlier. This can be really time consuming otherwise.


2 cups Cluster Beans, chopped, pressure cooked and drained
1 cup Curds
1 tbsp Gram Flour (Besan)
1 tsp Chilli Powder
½ tsp Coriander Powder
1 tsp Oil
¼ tsp Mustard Seeds
¼ tsp Asafoetida
½ tsp Fennel Seeds
Salt to taste


Beat the curds with the gram flour, chilli powder, coriander powder and salt. (A friend recently told me to use the blender to get the perfect texture while beating curds rather than use a whisk.)


Heat the oil in a kadhai. Add the mustard and asafoetida. When the mustard splutters, add the fennel seeds. As soon as the fennel crackles, add the curd mixture and bring to a boil over low heat, while stirring continuously. Add the cooked cluster beans and cook for another 5 minutes.

We had this with rotis for lunch and I know I will make it again next summer. For this summer, I have several other recipes to try out with this vegetable.

July 17, 2008

Black Chickpeas Sundal


I am trying to include more beans and lentils in our diet in an attempt to eat healthy. I’d always left
sundal for the festivals, but have recently started making it for breakfast or lunch. I also figured it made a great pre-gym snack in the evening. I soak these the previous night and cook them in the morning. When we get home in the evening, all I have to do is make the sundal.


1 cup Black Chick Peas, soaked overnight
1 tsp Oil7-8 Curry Leaves
1/4 tsp Mustard Seeds
1/4 tsp Urad Dal
1/4 tsp Chana Dal
1 tsp Green Chilli Paste
1/4 tsp Ginger Paste
1 Red Chilli
1/4 tsp Asafoetida
1 tbsp Coconut, scraped
Salt to taste

Pressure cook the soaked chickpeas with salt for 4-5 whistles. Drain when done.

In a kadhai, heat oil. Add the urad and chana dals, mustard seeds and asafoetida. When the mustard splutters, add the curry leaves, ginger and chilli pastes, and the red chilli. Fry for a minute. Add the cooked chickpeas, and a little salt. Cover and cook 4-5 minutes. Garnish with the scraped coconut and enjoy.


A bowl of this about half an hour before hitting the gym is a great answer to post office hunger pangs and keeps me from feeling "low" during a workout.

July 16, 2008

Kadhi and (No Fry) Pakoda for a Milestone


Remember my post on Palak Kadhi? This post is directly connected to that. Let me rephrase that. This post is a direct outcome of the comments that my namesakes, Arundathi and Arundati made on that post. One of them was happy that there was no deep frying and the other thought that fried koftas would have been nice. I couldn’t help remember this picture that was sent with some forward I received. But it got me thinking. For a week or so I thought about how I could have pakodas in my kadhi and yet avoid the pain of deep frying. Since S was traveling again, I had plenty of milk and curd in the house and decided to make kadhi yet again. I decided to make mixed vegetable pakodas to put in my kadhi.


So far, so good. But I didn’t want to heat oil to fry the pakodas. I did the next best thing. I brought out my appey kayli and made my “pakodas” in that. It tasted really nice and once the pakodas soak up the kadhi, you can’t tell that they weren’t fried. It is amazing what blogging does to you. One post and its comments led to my experiment and this way I can have my cake (err pakoda) and eat it too.


Pakodas (Dumplings):
2/3 cup Gram Flour
1 tsp Chilli Powder
1/2 tsp Baking Soda
1 Onion, finely chopped
½ cup Mixed Vegetables, chopped and steamed
1 tsp Green Chilli Paste
2 tbsp Coriander Leaves, chopped
Salt to Taste
A few drops of oil


Kadhi:
1 1/4 cups Curd/Yogurt
3 tbsp Gram Flour
2/3 cup Water
1 tsp Ginger Paste
1 tsp Garlic Paste
1 1/2 tsp Chilli Powder
1/2 tsp Turmeric Powder
1 tsp Coriander Powder
1 tsp Cumin Powder

Tempering:
1 tbsp Oil
1 tsp Cumin Seeds
4 Red Chillies

To make the dumplings, mix the gram flour with the chilli powder, salt, baking soda, onions, mixed vegetables, green chilli paste, and coriander leaves. Add enough water to form a thick batter. Heat the appey patra and lightly oil the moulds. Drop a spoonful of the batter into each mould. Fry until golden brown, turning once and using a few drops of oil if necessary.


To make the kadhi, whisk the curds with the gram flour and water. Add all the spices and salt and mix well. Bring this mixture to a boil over low heat, stirring constantly.

For the tempering, heat the oil in a frying ladle and add the cumin seeds. When they crackle, add the red chillies and take off the flame.


To proceed:

Add the pakodas to the kadhi. Add the seasoning and serve hot with rice.


This experiment couldn’t have come at a better time. This is my 300th post and, in my opinion, it is extremely reflective of the essence of blogging and all its associated joys. Thank you all.

July 15, 2008

Vegetable Makhanwala

This is a near pefect party dish. Not too spicy, not too bland. Perfect with rotis or pulao. And since it is made with mixed vegetables, there’s something in it for everyone. I even add pieces of paneer if I’m serving this at a party. (Yes, there are people who count paneer as a “vegetable”!) This way, I don't have to bother about catering to different people's likes and dislikes.


Ingredients:
1 tbsp Oil (Or ½ tbsp butter and ½ tbsp Oil)
1 Onion, ground to a fine paste
1 cup Mixed Vegetables, cooked
¼ cup Tomato Puree
¾ cup Slim Milk
½ tsp Turmeric Powder
1 tsp Chilli Powder
1 tsp Kasuri Methi
1 tsp Sugar


Salt to taste Heat the oil. Add the onion paste and fry for a few minutes. Add the turmeric and chilli powder and fry for another minute. Add the mixed vegetables and fry for 4-5 minutes. Add the tomato puree and salt. Mix well and cook until the mixture bubbles. Add the milk and bring to a boil while stirring. Add the kasuri methi and sugar. Cook for 5 minutes. Garnish this with coriander leaves if you wish and enjoy with rotis or rice.

This is my favourite way to serve and eat mixed vegetables. I also find this dish to be one of the best ways to clean up the fridge. You can put just about anything you find (except brinjals and lady's finger) and the dish would still taste like a million dollars.

July 14, 2008

Cabbage Karumadhu


I have met many cabbage haters so far. They seem to hate each and every member of its family. I’ve heard stuff like, “Ooooh, cabbage stinks”. I don’t know if I am oblivious to the “smell”, but I am definitely not a cabbage hater. I like in this form, I like it in a jhunka, I like it when it is paired with green peas. The only dish I really hate with cabbage is
khichdi. I made it a couple of times with cabbage and found that I couldn’t stand to eat it. This simple dish is what I crave with sambar and rice. It is relatively bland and compliments the "spicy" sambar very well.


1/4 kg Cabbage, chopped finely
1 tsp Oil
1/4 tsp Urad Dal
1/4 tsp Chana Dal
1/4 tsp Mustard Seeds
2 Red Chillies
1/4 tsp Asafoetida
1 tbsp Coconut, scraped
7-8 Curry Leaves
Salt to taste


Heat oil in a kadhai. Add the urad and chana dals, mustard seeds and asafoetida. When the mustard splutters, add the curry leaves and the red chillies. Fry for a minute. Add the cabbage and the salt. Sprinkle a little water. Cover and cook 7-8 minutes.When done, add the coconut and mix well. Serve as a side dish with rice and
Sambar.

July 13, 2008

Carrot Peanut Kosumbari


When we have guests over, I usually end up making this carrot kosumbari. But this other version is a personal favourite. I don’t even need rice and dal or any of those things if I’ve made this kosumbari. I am extremely content eating this version by the bowlful. I made this a couple of times when we had some people over and it was a great hit.


2 large Carrots, grated
1 Onion, finely chopped

1/4 cup Roasted Peanuts, coarsely powdered

2 tbsp scraped Coconut

1 tsp Green Chilli-Ginger paste
½ tsp Lime Juice

Salt to Taste

Coriander leaves for garnish


Mix all the ingredients together and garnish with coriander leaves. The addition of roasted peanuts gives this simple salad its crunch. Whenever you’re not in the mood for heavyweight cooking, this salad may just be the answer.

July 12, 2008

Soyabean Curry


I think I’m on my way to becoming Ms. Bean! I’ve started including beans and lentils into meals at least twice a week. I find the resulting dishes simple, tasty and healthy. I was clearing out a shelf when I came across a bottle of pigeon peas. I set to work and made
bendi. I found this bottle of white soyabean right next to the pigeon peas. The only thing I’ve ever had with white soyabean is bendi again. I didn’t want to make the same dish twice in the same week. But I soaked the soya beans anyway.


Armed with my bottle of Aashirwad Multipurpose Cooking Paste, I set out to make this very simple side dish.


1 cup Soya Beans, soaked overnight and drained
3 tbsp Multipurpose Cooking Paste
1 tsp Oil
1 tsp Chilli Powder
½ tsp Turmeric Powder
1 tsp Kitchen King Masala
Salt to taste


If you do not have this paste or would like to make the paste yourself, this is the recipe.

2 Onions, sliced

1 tsp Ginger-Garlic Paste

1-2 tbsp Oil

2 Tomatoes, blanched and sliced


Heat the oil in a kadhai and fry the onions along with the ginger-garlic paste. Add the sliced blanched tomatoes. Fry this for 2-3 minutes.


Heat the oil in a pressure pan and add the cooking paste. Add the chilli powder, turmeric powder and the kitchen king masala along with the salt. Fry for 2-3 minutes. Add the soya beans and enough water to cover the beans. Pressure cook for 3-4 whistles.

You could garnish this with coriander leaves if you wish. I forgot to do any of that. This dish was really a treat at lunch time and I’ll be sure to make this often.

July 11, 2008

Green Tomato Chutney


There was this time when we ran out of tomatoes. I simply continued to cook without using them in my cooking. I either made recipes that didn’t need tomatoes or dropped tomatoes from any recipe that did. Then finally when we did get to go shopping, I didn’t find any tomatoes at all. I was about to give up hope when I found a cart of green tomatoes. I thought something would be better than nothing and picked up a few. But I had no idea what to make with them until I came across this recipe at Lakshmi’s My Rasoi. I modified it a little bit. I decided not to add any tamarind as I thought the green tomatoes would be sour enough. I omitted the garlic from the seasoning, but added an onion to the chutney.


Ultimately, this was the recipe I followed:


4 Green Tomatoes, chopped roughly
1 Onion, chopped
3-4 Green Chillies, slit
1 tsp Cumin
1 tbsp Oil
½ tsp Mustard Seeds
7-8 Curry Leaves
2-3 Red Chillies, broken
Salt to Taste


Heat ½ a tablespoon of oil and add the cumin. When the cumin crackles, add the green chillies and the onions. Fry for about 2-3 minutes and then add the salt and the tomatoes. Cook for about 5-7 minutes and then take off the flame. Grind the mixture and transfer to a bowl.


Heat the other tablespoon of oil in a frying ladle. Add the mustard seeds. When they splutter, add the curry leaves and red chillies. Fry for a minute and pour over the ground mixture.


We had this with some steamed rice for dinner the day I made it and I spread it over my toast for the next three days. Less is definitely more and off this goes to Nupur’s MBP: Less is More. Since this dish makes use of a vegetable (or fruit?) that I can see only in summer, I am sending this to Sia for her edition of WBB: Summer Feast.

July 10, 2008

Breakfast in a jiffy

I’d asked everyone to send me a breakfast that’s ready in 15 minutes. What I didn’t realize was that this round up would definitely need much more than 15 minutes. I had an ulterior motive behind the choice of this theme. I really am hard-pressed for time in the mornings (not that my evenings are any different) and I’m perennially on the lookout for wholesome meals that can come together in a jiffy. And all of you have sent me so many entries that I haven’t classified the entries I received by the type of food item. I’d have loved to. After all, so many of you have sent in my favourite: Upma! But lack of time and the overwhelming desire to post the round up have made me take all kinds of crooked shortcuts. And that includes merging all your lovely photographs into one collage. But hey, this was an event designed to save time, wasn’t it?


These mini photographs are in alphabetical order. Top to bottom, left to right. For ease of identification, I will list the entries row by row. I had posted a big collage earlier, but half the pictures didn’t show and so for the moment, I’m going with the small sized collage. Should I find time during the course of this month, I shall reorganize the photographs. I’m participating in the NaBloPoMo this month and shall be posting once a day. Considering it took me three hours to just get home last night, I doubt I’ll find much time. But if I do, I’ll get to this. Going through this round up will cost you more than just 15 minutes!


Row 1


Archana of Archy’s Recipes: Wheat Sweet Pancakes
Arundathi of My Food Blog: Mango Jam with Cumin
Arundati of Escapades: Besan Roti (Picture not included in collage)
Arundati of Escapades: Upma
Asha of Aroma Hope: Baja Kichuri
Becke of Columbus Foodie: Sublime Scrambled Eggs
Bharti Khemani of VeggieFoodist: Chocolate Oatmeal
Bharti Khemani of VeggieFoodist: Oatmeal Seera
Cham of Spice-club: Wheat Idlis
Deeba of Passionate Baker and Beyond: Dropping Scones


Row 2

Deepa of Culinary Adventures: Roti from Leftovers (No Picture attached)
Deepthi Shankar of Vegetable Platter: Poha
Divya of Divya's Cookbook: Sweet Puttu
EC of Simple Indian Food: Mixed Flour Dosas
EC of Simple Indian Food: Ragi Sevai
Jaya of Spice and Curry: Tropical Smoothie
JZ of Tasty Treats: Middle Eastern Onion-Mushroom Omelette
K of K for Khichdi: Dhokla
Kalva of Curry In Kadai: Kiwi Strawberry Smoothie
Kamala of Mom’s Recipes: Rava Idli
Laavanya of Cookery Corner: Cucumber Sandwiches

Row 3

Latha of Masala Magic: Masala Kharabhaat
Meera of Enjoy Indian Food: Phovva Usli
Miri of Peppermill: Baked Eggs
Mona of Zaiqa: Upma
Nags of For the Cook in Me: Wheat Puttu (Picture not included in collage)
Nidhi of Charche Chauke Ke: Choode Matar ki Tehri
Nupur of One Hot Stove: Tikhat Sanja
Priya of Akshayapaatram: Berry Tasty Pancakes
Priya of Live to Cook: Express Potato Pancakes
Radhika of Tickling Palates: Coconut Pancakes
Radhika of Tickling Palates: Rava Upma
Ramki of Ramki Cooks: One page cookbooks - 1001 quickie breakfasts (Picture not part of collage)
Ramya of Ramya Cooks: Quick Dosa


Row 4

Ranjani of Wake up and smell the masala: Eggs Benedict
Ranjeetha Prabhu of RB Cuisines: Onion Wheat Dosa
Remya of Spices and Flavors: Vermicelli Veggies Upma
Renuka of FUSION: Onion Roti
Sharmila of Kichu Khon: French Toast
Sheetal of My Kitchen: Bhagar Swang
Sheetal of My Kitchen: Pangi
Sheetal of My Kitchen: Pumpkin Paratha
Sheetal of My Kitchen: Wholemeal Pancakes

Row 5
Sheetal of WhatzCooking: Besan Ke Cheeley
Shifa Firoz of Voiz Out: Upma
Sia of Monsoon Spice: Khatta-Meetha Khaman Dhokla
Sia of Monsoon Spice: Sabudana/Sago Kichidi
Sireesha of Mom's Recipes: Phodnichi Poli (Queen of leftovers)
Sireesha of Mom's Recipes: Batata Poha
Sireesha of Mom's Recipes: Tomato Omelette(vegetarian)
Siri of Siri's Corner: Akoori
Sita of Andhra Flavors: Simple and Healthy Avocado Sandwich


Row 6

Skribles of Food with a Pinch of Love: Samosa Sandwich
SriLekha of Me and My Kitchen: Bread Upma
SriLekha of Me and My Kitchen: Curd Rice
SriLekha of Me and My Kitchen: Temple Rice
SriLekha of Me and My Kitchen: Vegetables Noodles
Srivalli of Cooking 4 all Seasons: Sevai ~ Coconut Rice Noodles
Srivalli of Cooking 4 all Seasons: Ragi Idli
Suganya of Tasty Palettes: Eggs En Cocotte
Sujatha of Spicy Khazana: Tomato Uthappam


Row 7

Suma of VeggiePlatter: Coconut Poha
Suma Rajesh of Suma's Cuisine: Quick Upma
Sumi of Sumi's Kitchen: Mixed Veggie Egg Scramble
Supriya (who doesn’t have a blog as yet): Couscous Upma with Edameme Beans (Recipe Below)
Supriya (who doesn’t have a blog as yet): Scrambled Tofu (Recipe Below)
Sushma of CookSpot: Semolina Steamed Balls/Rave Unde
Trupti of Recipe Center: Carrot Sandwich, Eggless Tomato Omelette, Karela Fritters, Multigrain Cucumber Vada , Poha, Ragi and Karela Dosa , Shewaya
Uma of Telugu Ruchi: Millet Dosa
Usha of Spicy Kitchen: Murmura Upma

Recipe for Couscous Upma:
I soaked 1 cup dry couscous in warm salted water for 5 mins. In the meanwhile, heated 2 tsp oil in a non-stick fry pan, tempered with mustard seeds, cumin seeds and hing. Then added 1 small chopped onion, 2 dry red chillies (broken), handful of broken cashew pieces. Next went in about 2 cups of frozen edamame beans (soy beans) and few tblsps of water. Covered and cooked this for about 5 mins. Then mixed in the soaked couscous, salt, sugar and lemon juice. This can be garnished with coconut and coriander, but I didn't have any on hand on Saturday.

Recipe for Scrambled Tofu:
This was Sunday's b'fast. I heated 2 tsps olive oil, added 1 tsp jeera seeds, then 1 small chopped onion and 1 chopped green chilli. Fry this for a few mins. In the meanwhile, I drained 1 14 oz. packet of firm tofu and roughly chopped it. I added this to the onions, increased the heat to high and sauteed the tofu for about 5 - 7 mins till all the water that the tofu leaves dries up.Then add turmeric, salt and pepper to taste. Garnish with chopped cilantro.

Row 8


Vandana Rajesh of Cooking up Something Nice: Bread Cutlets
Vidhya of My Receipes: Kunukku
Vani of Ilatharasi: Fried Idlis Capsicum Sandwich


And lastly, my own entries:


Gava Pittye Doddak
Potato Peas Peanut Poha
Dal Paratha
Undyo
Capsicum Semia Upma
Instant Semolina Dosa


Now you have no excuse to not eat breakfast. "I didn't have enough time" is such a redundant excuse now. Happy breakfasting everyone!


July 9, 2008

Peach Streusel Cake


I’ve been baking for a very long time. But there have been times when I really need a push to break away from my comfort zone. Baking with yeast was one such turning point. Making cookies was another. Making cakes with fresh fruit has been a third. The only thing I really ever did with our summer bounty each year was to fill our fruit boxes with them. Every once in a while, I’ve made some shakes or stews, but I didn’t venture beyond that. I’ve used apples and pineapples in pies, but almost never in a cake.


Then it happened. I was chatting with my namesake after a trip to Madras and was telling her about the stuff that I took to my parents’ place. I always feel I have to share my summer bounty with them. I sent a kilo each of peaches, litchis, apricots and cherries with S when he visited Hyderabad and I did quite the same when I visited my parents. Just that I always take extra peaches to Amma. Arundati asked me why I was wasting these fruits in a milk shake when I, the “baby baker” as she calls me, could do a lot more.


I thought about various options and finally made this peach streusel cake. It was gone in no time. I know I’ll make this again before these blushing beauties go out of season. The only change I’d make to this recipe is to use more peaches. So, please feel free to add another peach or two. This is the recipe that I followed.


2 cups Flour
6 tbsp Oil
¾ cup Sugar
3 tsp Baking Powder
1 Egg, beaten
2/3 cup Milk
4 Peaches, peeled and sliced

For the Streusel Topping:

¼ cup Butter
½ cup Brown Sugar
½ cup Flour


1 tbsp Icing Sugar for dusting


Grease and line two 8-inch cake tins. Mix together the ingredients for the streusel topping.


Mix the flour, baking powder, and sugar together. Add the oil, milk and beaten egg and whisk together. Divide the batter between the two cake tins. Arrange the peach slices on top of the batter and sprinkle the streusel topping over the fruit layer.


Bake at 350F for 30-35 minutes or until a skewer inserted in the cake comes out clean.


Dust with icing sugar and serve.


We enjoyed this cake fresh out of the oven and it tasted great when cool as well. I didn’t dust any icing sugar as I thought the cake was very sweet already! During my trip to Madras, I made Almond Raisin Muffins, Mava Cake, and Carrot Cake for my parents and brother. But as it turned out, Amma’s baking powder didn’t seem to work and I was left with very tasty, but flat, cakes and muffins. I sent this with S when he visited Madras on work and I am really happy my folks were able to enjoy it.

This cake has come about thanks to my dear namesake, Arundati. We’re two girls who have more in common than we even know. We’ve lived in the same cities, the family background that we came from and some facts about the guys we’re married to are uncannily similar, we’re about the same age and our husbands are the same age, we have similar interests and qualifications, we have the same initials and almost identical handwriting, and to a large extent, similar views on life, food included!). She sent me packed dinner along with a host of other things when she was told that S was in her city for a day.


She’s a gem of a person and I am so glad to have found her. As she celebrates her birthday, I’m sending this little cake her way. It isn’t half as elaborate as the ones she makes for her loved ones, but it is filled with all good things, peaches and love. Happy birthday!

July 8, 2008

Spring Onion Jhunka


Another acquired taste. Spring Onions were not freely available in Madras at one time. I remember attempting to make Chinese food merely because I’d found a bunch of spring onions. Now they’re freely available everywhere. And I couldn’t be happier. But there was a time when I hated Jhunka made with spring onions. I think it was merely because Amma would use up “my” spring onions to make “her” dish, that too an Indian one. When I look back, I realize what she must have gone through. Imagine when your daughter, in all her enthusiasm, picks up a bunch of spring onions, which are “exotic” to some extent and then goes back to being her normal lazy self, quite forgetting the bunch that’s beginning to wilt. What would you do? I think I’d make Jhunka!


1 bunch Spring Onions
1 tbsp Oil
¼ tsp Mustard
¼ tsp Asafoetida
1 tsp Chilli Powder
1 tsp Turmeric Powder
2 tbsp Gram Flour (Besan)
Salt to taste


Separate the whites and the greens and chop the spring onions finely.


Heat the oil in a kadhai. Add the mustard seeds and when they splutter, add the asafoetida. Add the onion whites and fry for a few minutes. Add the greens, salt, chilli and turmeric powders. Add the gram flour and cook for a couple of minutes. Serve hot.

I find this one of tastiest and easiest ways to use spring onions. I make it very often when these beauties are available in abundance. This pairs very well with rotis but tastes even better if you use it as a stuffing in a grilled sandwich. So, the next time life hands you spring onions, you know how to make jhunka!

July 7, 2008

Mango Kulfi


I am a big ice cream fan. My mother used to make the most delicious ice cream at home that we’d dig into very religiously after dinner. Someday I’ll blog about that. Even now, we almost always have ice cream in the freezer, but I barely eat it. I feel very bad when I sometimes have to throw some of it away to make space for other more precious stuff. But Gurgaon has these ice cream cycles of all companies just about everywhere. So, when I feel the urge, all I have to do is step outside our apartment complex and choose from Mother Dairy, Kwality Walls, Vadilal and Cream Bell. With all this choice, I end up eating the same Orange Ice Candy.


When I was little, we didn’t have as much choice. Some trips to the Adyar Bakery House on Sardar Patel Road would result in a treat with Joy Ice Creams. Dinners at Woodlands Hotel on Edward Elliots Road would always end with a slab of vanilla, chocolate or strawberry ice cream. The occasional buffets that we were treated to at the Taj Coromandel or Connemara would mean that we’d stand almost perennially in front of the ice cream counter.


Then there’s the Indian ice cream that I was introduced to soon after my eldest cousin’s wedding: Kulfi. She’d been married almost 25 years when S and I tied the knot. When we visited “her” house at Antop Hill, the summer after her wedding, we ended our dinner by calling the kulfiwala. I was hooked from the first bite. And then I’d started demanding it almost every night for the month that we stayed in Bombay. Year after year. Until Amma started making the stuff at home.


There was a time when Nestle’s Milkmaid was much sought after. I remember a time when they either gave away free recipe booklets or kulfi moulds. We still have two of their signature blue plastic kulfi moulds and a much used worn out recipe booklet. My dear friend A gifted me the Milkmaid Gold Collection of desserts a few years ago and I have since forgotten about the booklet. I am sure it is still among my parents’ books. This booklet taught Amma how to make the kulfi that filled our freezer almost all year long.

I wanted to make kulfi and didn’t have any moulds. I don’t like eating kulfi in Delhi/Gurgaon because they add kewra to it. I can’t stand the taste of it. Some places add a wee bit of rose essence. Some add both. I figured the easiest way to eat the kind of kulfi I wanted was to make it at home. So, I bought moulds in Madras. (I am like that only!) I also froze several packets of milk before I left for Madras just so I could make kulfi when I got back. That’s called planning.

Banganapalli mangoes have retreated from the markets and we now have Dusehri and Langda. I’d brought back some Banganapalli from Madras and after eating those I didn’t really enjoy these other varieties. But I bought them and had to do something with them. So I decided to make Mango Kulfi. It is so much simpler than I thought and we took some over to dinner at a friend’s place that night. It was all gone in minutes. My first attempt at kulfi making was a great success and I’m so thrilled with the results. I’m sending this over to Meeta for her Monthly Mingle.


1 litre Milk
1 tbsp Flour
1 ½ cups Mango Pulp
1 tin Sweetened Condensed Milk (I used Milkmaid)


Heat the milk, condensed milk and flour together and bring to a boil. Do this over a low flame and stir continuously as the condensed milk has a tendency to stick to the bottom of the vessel and get burnt. Cool completely. Mix the mango pulp into the milk mixture. Fill the kulfi moulds with this mixture and freeze until set. When set, dip the moulds in warm water, unscrew and hold over a plate. The kulfi slides out effortlessly.


I ensure that I place the moulds directly on the freezer floor and not on top of something else. (Amma did this before we had a frost free kitchen. I’m not even sure this is necessary anymore, but I still do it.)


I plan to try this out with other fruit pulp and I promise to share my results with all of you!

July 6, 2008

Baked Herb Croutons


As a child, one of the main reasons I looked forward to soup was the croutons that went into them. Amma would have to ration out the croutons because otherwise, we’d probably not touch the soup.


Even today, when I travel by train, I buy myself a cup of hot tomato soup. And eagerly wait for the vendor to put those 3 croutons into the cup. The soup is nothing but hot pepper water, but the croutons make me believe that it really is tomato soup!

I baked “herbie” bread and then converted it into croutons that I can store. These are great as a snack as well. Plus there is no need to ration these out anymore.


2 cups Flour
1 cup Atta
1 tbsp Mixed Herbs
1 tsp Chilli Flakes
1 cup Water
1 tsp Yeast
1 1/2 tbsp Oil
3/4 tsp Salt


Take a huge mixing bowl and place the oil, salt in it. Add water and mix until the salt dissolves. Add the yeast and mix well. Add the flours along with the herbs and chilli flakes and knead into a dough. Place the dough in a greased vessel and cover it with a damp muslin cloth. Allow to rise until double in size (roughly 45-50 minutes).

Knead the dough for a minute and shape into a loaf. Fit this into a greased loaf tin. Allow to rise for another hour or 90 minutes.

Bake at 375 F for about 25 minutes. Cool on a wire rack and then cut into slices.


Cut the slices into small cubes and bake in a hot oven (450F) for 15 minutes. The cubes will be nice and crisp by now. Store them in an airtight container and use in your salads or soups.