Google
 

December 31, 2010

Mixed Fruit Crumble


How does one even begin to summarize a year which seems to have packed in so much? The year which began for in the absolutely cold snow mountains and will end in the sunny and warm tropics. On January 1, 2010, if someone had told me that the year would bring a whole host of changes, I'd have laughed and said that that is what every year does. But as I look back today on the year gone by, I realize that this year was special.

There were so many ups and downs that this year brought with it. The highs outshone the lows and I am glad that the year will be remembered for the highs and it will only be a matter of time before the lows are forgotten.

On the blogging front, both my blogs suffered as a result of the highs and the lows. There simply wasn't any time. The project 365 suffered because as the monsoons began, my travel time to and from work increased from 3.5 hours a day to around 5.5 hours one way. While I did take loads of pictures, the last thing on my mind when I reached home just a little shy of midnight was to upload the pictures to the laptop or the blog. Slowly, I was so far behind that it didn't make sense to try to catch up.

The food blog suffered because there was no time. There was also no "new" cooking that happened. It is a miracle that cooking even happened on some days. I think August and September must have seen the maximum consumption of Maggi, Subway sandwiches and McDonald's burgers. We also ate out so often because that meant no washing up afterwards (a lifesaver when your maids have been thrown out of the city for 30 days).

In our initial days in Singapore, I barely cooked and definitely didn't cook new stuff. But I realized that I could churn out 3 meals a day with just 3 pans, a 2 hob induction cooker and a microwave. For someone whose kitchen articles make up 30-35% of the entire household stuff, that is a BIG revelation. The pressure cooker queen cooked for 30 days sans the sweet sound of the whistle of her precious cookers.

I have no plans for 2011. I hope to write about my experiences in a new place in my other blog. I hope to cook with the new variety of ingredients that I have access to. I hope to be able to try out the recipes that I could only fantasize about until I moved here. I don't want to make concrete plans. 2011 is going to be the "take it as it comes" year.

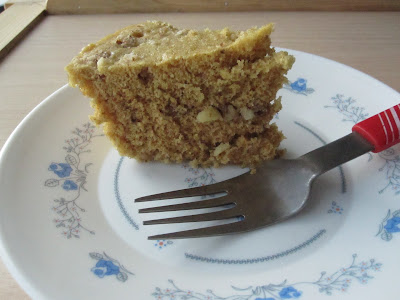
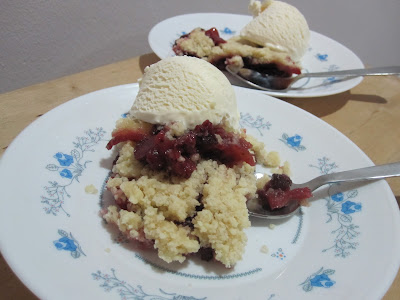
Keeping in with tradition, I leave you with a dessert recipe. A little warm, a little cold. A little tart, a little sweet. Just the way this year has been: a mixture of flavours that surprises you with each bite, but leaves you with a happy feeling when the last bit has been savoured.

Ingredients: 


1 Apple, peeled and chopped
1/4 cup Cherries, halved
1/4 cup Strawberries, chopped
1 Pear, peeled and chopped
1/4 cup Brown sugar
2 - 3 tbsp Butter
1/3 cup Flour


Arrange the fruit in a microwave safe dish and sprinkle the sugar. Build 2-3 layers alternating the fruit and the sugar. Leave about a spoonful of the sugar aside. Cook oh high in the microwave for 4-5 minutes.

In a separate bowl, mix the flour and the butter along with the remaining sugar until it resembles bread crumbs or small peas. Press this mixture over the cooked fruit and bake in the microwave on high for 8-10 minutes. Allow to stand for 10 minutes for the crust to harden. Cut into pieces and serve with vanilla ice cream.

I hope 2010 was a good year for each of you. Wishing all of you and yours a very happy 2011.


December 29, 2010

Moong Dal Cheela


I miss going to work. The reasons are countless. One of the biggest food related pluses of going to work is getting to taste different kinds of dishes. One of the other pluses is getting new ideas for breakfast, lunch and dinner or just being able to give new twists to routine dishes. But the food related aspect I miss the most about working is being guaranteed company at mealtimes. Eating alone is a pain.

One of my former colleagues had a maid at home who would make the best breakfast dishes I've ever had out of a box. She could be on Masterchef. A sandwich would not only have a great filling, but would be cut in 4 pieces and there'd be a wee bit of tadka on each piece.

This breakfast idea comes from this lady. To me, a cheela was always made with besan. And a pesarattu was always made with whole green moong. To make a cheela with moong dal was unknown to me (I know a lot of you have known this a long long time.) as was making a pesarattu with moong dal. This is like a cross between a cheela and a pesarattu.

1 cup Moong Dal, soaked overnight
2 Green Chillies, roughly chopped
1" piece Ginger, roughly chopped
1 tsp Cumin Seeds
Salt to taste

Grind the moong dal with the green chillies, ginger, cumin and salt. Add enough water to make a thick batter.

Heat a tawa and smear a little oil on it. Simmer the flame and pour a ladleful of the batter in the centre of the tawa. Quickly spread the batter while forming concentric circles (spiral actually!). Add a little oil on the sides and centre. Usually not more than a few drops per cheela. When crisp, carefully turn the cheela over and allow the other side to cook a little.

I serve these with whatever I have on hand. But it tastes best with some green chutney. As a variation, you could also sprinkle some finely chopped onions and tomatoes on top of the batter as soon as you spread it on the tawa. This makes it a very visually appealing breakfast.

As long as you remember to soak the moong dal at night, this is a no sweat breakfast in the morning as there's no fermentation required.

December 27, 2010

Macaroni with Parsley-Peanut Pesto


There was a time I hadn't heard of pesto. Then came the time when I'd heard about it, but knew nothing about it. Then came the time when I first ate it. And then came the present. The time when I've heard about it, I know about it, I've eaten it, I make it and I experiment with different flavours. I've come a long way from asking a friend to bring me pine nuts from the US to using the humble peanut in my pesto.


At one time, I'd substitute pine nuts only with cashews. But I've become a bit more adventurous of late. Any nut and any kind of herb (needn't be a herb) and I've got a pesto going. To make it suitable for a lunch box, I added some mushrooms and some milk.


1 cup Macaroni, Cooked/Boiled with a little oil and salt

1 tbsp Olive Oil
2-3 tbsp Milk
1/2 cup Mushrooms, sliced


For the Parsley Pesto:


1/2 cup Parsley Leaves
1 cube Low Fat Cheese
2 tbsp Roasted Peanuts
2 pods Garlic
3 tbsp Olive Oil
1/2 tsp Chilli Flakes


Salt and Pepper to taste


Grind together all the ingredients for the pesto.


Drain the pasta and keep aside.


Heat the olive oil in a saucepan. Saute the mushrooms for 3-4 minutes. Add the pesto sauce and fry for a few minutes. Add the milk to get a sauce like consistency. Add the pasta and mix well. Season with salt and pepper.


A meal that comes together in minutes. There's not much chopping involved. And since I use a food processor to grind the pesto, there's no pounding to be done either. This is a perfect recipe for times when you want a nice meal and don't want to slave over the stove too much.

I hope all of you had a good Christmas. Happy Holidays!

December 9, 2010

Savoury Butternut Squash Waffles with Mushroom Cream Sauce


The last few months were a little crazy for us. Work, the commute, the rains, and the Commonwealth Games. Bang in the middle of all this, came our decision to move to a different country. Work had become more hectic all of a sudden. The unprecedented rains caused traffic snarls that transformed my otherwise 2 hour commute back into a 6 hour commute. The roads caved in for most part. To add to the trauma, the Commonwealth Games meant that one lane in the already congested roads of Delhi was to be cordoned off. Then came the final blow. Our domestic help was asked to leave for a month and return after the games.

My project 365 came to an absolute standstill and this blog saw months go by with just one (and even no) post. There are several factors that have helped revive this blog. The most important of them all is Vitamin T. I am unemployed after more than 11 years of working continuously. I have plenty of time on my hands. I'm based in a truly global city and that means that I have access to plenty of ingredients that I'd have considered exotic earlier. I also have access to the Food Network channel (which I seem to watch almost all the time). I get new ideas and more importantly, I am reminded of my love for cooking.

This week started with Amma's birthday and I wanted to celebrate it here. I had several ideas and I also wanted to clean up the (really small) fridge that I have here. I got the idea for savoury waffles from a show on TLC. I combined that idea with a dish I'd eaten many years ago in Chennai: Crepes with Sauteed Mushrooms and Cream Sauce. I decided on savoury butternut squash waffles with and a mushroom cream sauce. I also made a Mini Caprese Salad, sticking to the original recipe for most part and adding a cucumber to the cherry tomatoes.

Butternut Squash Waffles

3/4 cup Butternut Squash (peeled, diced, cooked and drained)
1 Egg
1 tbsp Olive Oil
1 tsp Chilli Flakes
1/2 cup Flour
1/4 tsp Baking Powder
1/4 tsp Baking Soda
1/2 tsp Pumpkin Pie Spice (optional)
Salt to taste

Beat the egg in a bowl. Add the butternut squash and beat until the mixture is well blended. Add the other ingredients and beat for a minute or so. (If the mixture is too thick, you could add a little milk.)

Heat the waffle iron and pour the batter onto it. Cook for about 3-4 minutes. Repeat with the remaining batter.

Mushroom Cream Sauce

1/2 cup Mushrooms, sliced
1 medium Onion, finely chopped
1/4 tsp each of Basil and Parsley
1/4 tsp Chilli Flakes
1 tbsp Butter
1 tbsp Flour
3/4 cup Milk
Salt and Pepper to taste

Melt the butter in a pan and add the chopped onions and fry for a couple of minutes. Add the mushrooms and fry for a couple of minutes. Add the parsley, basil and chilli flakes. Add the flour to the mushroom mixture and pour the milk into this after the flour has fried for 2-3 minutes. Mix well and allow the mixture to thicken. Season with salt and pepper.
 
Place the waffles on a plate and pour the mushroom sauce over the waffles. Dig in. Restaurant style fancy dining guaranteed at home with not much effort. Belated Happy Birthday Amma. I can't wait to cook this for you when you visit.

December 8, 2010

Stuffed Brinjal


The one big food related plus of having time on my hands, which was a scarce commodity barely two months ago, is being able to make dishes that require a little more time than others. It helps also to live in a city where many ingredients are easy to come by. For instance, I found this bag of almost identical sized baby brinjals   when we went grocery shopping. I bought the bag immediately, wanting to make Ennai Katrikkai. But I was missing a crucial ingredient. I decided to make this dish instead.

This dish is not a family recipe or anything like that. We had a lady working for us many years ago. One day, she asked Amma if she can make a side dish to go with chapatis. Amma agreed. She made this and all of us really liked it. It featured regularly on our menu for several years. I'd forgotten about this dish and made it just once earlier after Amma reminded me about 1-2 years ago. I made it again last week and it was gone before we knew it.

1/4 kg Baby Brinjals, slit crosswise with stems intact
2 Onions, finely chopped
2 tbsp Coconut, scraped
2 Cloves Garlic
1" piece of Ginger
1/4 cup Coriander Leaves, chopped
1/2 tsp Turmeric Powder
1 tsp Chilli Powder
1/4 tsp Garam Masala
1/4 cup Roasted Peanuts, coarsely crushed
Salt to taste
1 tbsp Oil

For the tempering
1 tsp Oil
1/2 tsp Mustard Seeds
1/4 tsp Asafoetida
7-8 Curry Leaves

Heat the tablespoon of oil and add the onions. Fry for about 3-4 minutes and add the coconut. Fry until the coconut turns brown. Grind this mixture with the garlic, ginger, and coriander leaves. Mix the turmeric powder, chilli powder, garam masala, and salt into this paste along with the crushed peanuts.

Stuff this mixture into the slit brinjals.
Heat the teaspoon of oil in a kadhai/pan. Add the mustard. When the mustard splutters, the asafoetida and the curry leaves. Add the stuffed brinjals and cover and cook for 5-7 minutes or until the brinjals are cooked. Uncover and cook for a minute or two.

Serve hot with chapatis or with some rice and dal. I could just eat this on its own. I also realized that this dish doesn't take as long to prepare as I'd imagined. Agreed that it has more steps than a simpler side dish, but it is in no way complicated.

December 3, 2010

Tendlya Bhutti


Here is the dish I really wanted to send in to the RCI Udipi and Mangalore (how long ago was that?) event that Sia hosted. I just didn't make it in time. This dish is Mangalorean in every possible way. Amchi in every possible way actually. It has all the ingredients that amchis love: coconut, tamarind, jaggery, bedgi chillies and tendli! Though this is made with a little gravy (not much), I make it a little dry as S likes it that way. (Did you just buy that? Well... as always, I sauntered out of the kitchen with the dish on the stove and returned to almost no gravy!)


1 1/2 cups Ivy Gourd (Tendli/Kundru/Kovakkai/Dondekkai), sliced into discs
Salt and Jaggery to taste

For the masala:
3-4 Red Chillies (preferably Bedgi)
1 tsp Coriander Seeds
1/2 tsp Black Gram Dal (Udad Dal)
1/4 tsp Fenugreek Seeds
4-5 Garlic Cloves
3 tbsp Coconut, scraped
2 tsp Tamarind Paste
1 tsp Oil

For the tempering:
1 tsp Oil
1/4 tsp Mustard Seeds
1/4 tsp Asafoetida

Heat oil in a kadhai. Add the mustard seeds. When the mustard seeds splutter, add the asafoetida. Add the ivy gourd pieces to the oil and fry for a minute. Add the salt and jaggery, mix well and cover and cook for 4-5 minutes.

In the meanwhile, heat the teaspoon of oil for the masala and fry the red chillies, coriander seeds, black gram dal, fenugreek seeds and garlic for a minute or two. Grind this to a paste with the coconut and the tamarind paste.

When the ivy gourd pieces are tender, add the ground masala to the vegetable and mix well. Bring the mixture to a boil and cook until the ivy gourd pieces are covered with the masala and the entire mixture is a little dry.

This is a dish that you can enjoy with chapatis as much as with some rice and dali-saar.

November 30, 2010

Adai


Adai. It has to be one more of those acquired tastes. I have childhood memories of eating Adai with jaggery. As I grew older, the combination didn't seem so attractive. Or maybe Amma didn't give me jaggery anymore with Adais. My "love" for the Dosa probably overshadowed my appetite for any of its many cousins.

One of my friends, P, told me to make sure that I always have dosa batter of some sort in the fridge. So I started varying the batters that I had on hand. One evening, I came home from work to find that I had a little bit of extra time on my hands. And I also had a bag of mixed chopped vegetables in the freezer. I decided to make some Avial and pair it with the Adais. (The combination is almost as nice as Adai with jaggery.)

1 cup Rice
1/3 cup Udad Dal
1/3 cup Chana Dal
1/3 cup Toor Dal
3-4 Red Chillies
1 Green Chilli
7-8 Curry Leaves
1 tsp Ginger Paste
1/4 tsp Asafoetida
Salt to taste
Soak the rice and the dals together overnight. Grind this to a batter along with the red and green chillies, curry leaves, ginger, and salt. Add the asafoetida to the prepared batter.

To make the adais, heat a tawa and smear a little oil on it. Simmer the flame and pour a ladleful of the batter in the centre of the tawa. Quickly spread the batter while forming concentric circles (spiral actually!). Add a few drops of oil and allow the adai to crispen. Turn the adai over and cook the other side for a minute or so.

Serve hot with some jaggery or some Avial.

This post has been in my drafts for ages. I had always heard of Adai Avial as a combination, but had never tasted it. This version that I made at home, I really enjoyed. I had this combination outside home for the first time here in Singapore at Ananda Bhavan and was thoroughly disappointed. I like my dosais/adais to be a little crisp (not paper thin). The version I got at the restaurant was very thick and had huge bits of coconut and whole pepper corns and multitude of things that were added to the batter. It was a task to tear a piece of the adai and dip it into the avial and eat it. That prompted me to finish this post and publish it. The next time I want to have this treat again, I'm making it at home!

November 16, 2010

Vendhaya Keerai Thuvayal (Methi Chutney)


I have a whole variety of dishes that I make with fresh fenugreek leaves. Methi Pulao, Methi Mutter Malai, Palak Methi Dal, etc. But I realized I'd almost never tried to use the leaves in any kind of south Indian cooking. This one time that I brought home a fresh bunch, I decided not to go down the Aloo Methi path and tread on my other tried and tested route instead. The route which leads me to the tangy, spicy paste we all know as a thuvayal or thogayal.

1 1/2 cups Fenugreek Leaves, washed and roughly chopped
1 tbsp Oil
1 tsp Mustard Seeds
2 tsp Black Gram Dal
1/4 tsp Asafoetida
2 Green Chillies
1/2 tsp Chilli Flakes
1 tsp Tamarind Paste
Salt to Taste

For the tempering:

1 tsp Oil
1/2 tsp Mustard Seeds
1/2 tsp Black Gram Dal
a pinch Asafoetida
5-6 Curry Leaves


Heat the oil and fry the green chillies, red chilli flakes, mustard, asafoetida and black gram dal for a couple of minutes. Add the fenugreek leaves and fry for 4-5 minutes. Grind the mixture along with the tamarind paste and salt. 

Heat the teaspoon of oil for the tempering in a frying ladle. Add the mustard, black gram dal and the asafoetida. When the mustard splutters, add the curry leaves. Add this tempering to the fenugreek leaves mixture.

Serve this with rice and a little ghee and some papads or vadams on the side. I expected the thuvayal to be a little bitter, but somehow, the flavour of the fenugreek leaves came through with only a hint of the bitterness.


November 12, 2010

Instant Microwave Banana Nut Cake


I've resumed cooking. It was something I had to do to bring in a sense of "normalcy" into my life. Attempting to cook in the serviced apartment without a pressure cooker was an experience in itself. I realized how much I took my kitchen in Gurgaon for granted. But I also realized that healthy meals are possible even if you have almost no appliances and only three utensils.

After we moved into our apartment, the first set of boxes we opened were the ones which would help me start cooking. Slowly, all my appliances came out of their boxes and I was thrilled to see the pressure cookers, the mixer-food processor and my wet grinder. Once I got into the groove of day to day cooking, I started missing baking. And I started missing my oven. For the moment, I only have a basic microwave. I decided to stick with it for the time being and invest in a combination oven in a couple of months. But (my friends know this) I needed to bake to feel really normal.

I've only baked two cakes in the microwave before this. I also don't have a fully stocked pantry as yet. So, I quickly stocked up on baking powder, baking soda and some vanilla essence. I started scouting for more microwave cake recipes with easily available ingredients. My research brought me to cooks.com and I found a banana nut cake recipe that seemed to call out to me. I decided to improvise with what I had on hand and also made several substitutions to make it a very healthy cake.

The final result was fabulous. The cake wasn't crusty on top, but I know not to expect that from a microwave cake. The texture of the cake was as good as, if not better than, most banana cakes I have baked in the past. This recipe is a sure shot keeper.

1/4 cup Oil
1/4 cup Low Fat Milk
1 Egg
1 Ripe Banana
1/2 cup Jaggery, grated
1/2 cup Whole Wheat Flour
1/4 cup Flour (Plain)
1/2 cup Mixed Nuts, chopped
1/4 cup Raisins
3/4 tsp Baking Powder
1/4 tsp Baking Soda

In a blender jar, beat the egg until fluffy. Add the banana and blend until there are no lumps. Add the jaggery, oil and milk and blend again. Add the flours along with the baking powder and baking soda and blend for a minute or two.

Grease a microwave safe baking dish. Pour the batter into the dish and stir in the chopped nuts and raisins. Bake on high (800) for 8 minutes. Allow to stand for 10 minutes. Cut into slices and dig in.

I'm glad to be back to cooking, baking and blogging as well. I'm even happier to be able to send this to an event I regularly participated in: The Monthly Mingle. This month, Deeba of Passionate About Baking is hosting this event and I am sending this to Deeba as my entry to Fruit in Baking.

November 10, 2010

Beetroot Karumadhu


While growing up, how many times did you have to be told to eat something because it is good for you? I've lost count. Of course, I also didn't have to be told such things. I didn't quite know that  there was this option to say, "I don't want this." The only threats/coaxing I ever received had to do with the speed of my eating.

"XYZ's mother says that her hair grows long because she sits down for dinner at 8 and finishes by 8.15."

I still don't have long hair. I am still in touch with XYZ and I know she has long hair. And I know that finishing dinner in 15 minutes cannot be the only secret. And guess what? The world is talking about the benefits of eating slowly. I must admit that I do finish my meals faster than most people.

Beetroots in Indian cooking must have caused (still be causing)  a great deal of stress to children. I suppose that children are either put off by the colour or drawn to it. There cannot be a middle path. Actually, there is no middle path for adults either. What are my views on beets in Indian cooking? Beetroots are best used in salads and cakes, and of course in soups.

As far as Indian food goes, I like beets in things like chutneys. The occasional sambar or rasam with beets is a welcome change. The stir fries/sautes I deal with when I have to. That would explain why this recipe is not exactly a weekly feature in my home.


1/4 kg Beetroot, peeled and diced Steam the beetroot until tender.
1 tsp Oil
1/4 tsp Urad Dal
1/4 tsp Chana Dal
1/4 tsp Mustard Seeds
2 Red Chillies
1/4 tsp Asafoetida
1 tbsp Coconut, scraped
7-8 Curry Leaves
Salt to taste

 
Heat oil in a pan. Add the urad and chana dals, mustard seeds and asafoetida. When the mustard splutters, add the curry leaves and the red chillies. Fry for a minute. Add the chopped beets and the salt. Sprinkle a little water on top. Cover and cook for 2-3 minutes. Add the coconut and mix well.
 
This is a pretty side with the usual rice and sambar/rasam routine. Perfect when you really do need a splash of colour on your plate.


November 9, 2010

Spinach and Cheese Pasta


As an adult, I developed a taste for stuff that I almost always turned up my nose at as a child. Pasta is one of them. Considering how often pasta finds its way into our meals, it feels like my childhood must have been part of another life.

The inspiration for this dish comes from one of the baked dishes I tried almost a decade ago in Madras. It comes together very easily, especially if you always have a stash of processed vegetables in your freezer. For this recipe, I used the Whole Wheat Pasta from Fabindia. I've been hooked to this ever since I tried it for the first time.

1 cup Whole Wheat Elbow Macaroni
1 cup Spinach, chopped and steamed for 5-7 minutes
1 tbsp Butter
1 tbsp Flour
1 cup Milk
1/2 tsp Parsley
1/2 tsp Basil
1 tsp Chilli flakes
1/2 tsp Garlic Paste
Salt and Pepper to Taste
1 slice Low Fat Cheese

Boil the macaroni according to the instructions on the pack.

Heat the butter in a saucepan. Add the spinach and fry for a minute. Add the garlic paste, parsley, basil and chilli flakes and fry for another minute. Add the flour and fry without browning the flour. Add the milk and bring the mixture to a boil while stirring continuously. Add the cheese at this point and stir the sauce well. As the sauce thickens, add the salt and pepper. Add the macaroni and serve hot.

I served this with some garlic toast. A quick dinner. Simple, yet wholesome.

November 8, 2010

Poondu Thuvayal


Garlic. While many people I know would turn their noses up at this bulb, S and I are two of a kind, the other kind. Yes, we'd both firmly fall into the "Mad about garlic" club. A few months ago, S was unwell and his mother said that garlic would help. So, I sat and peeled an entire bulb. (Now I know it will be a long time before I have to sit down and peel an entire bulb. At least I have access to ready peeled garlic here.)

In one weekend, I made several dishes using garlic. I never did really find out if it cured S of his cold and congestion, but we did have one great meal after another.

One of these dishes was the simple thuvayal featuring garlic. 


1/2 cup Garlic cloves, peeled and roughly diced
1 tsp Oil
3-4 Red Chillies
2 tsp Urad Dal
1/2 tbsp Tamarind paste
Salt to taste


For the tempering:
1 tsp Oil
1/2 tsp Mustard Seeds
7-8 Curry Leaves


In a small pan, heat the other teaspoon of oil and add the urad dal. When it turns slightly brown, add the red chillies and fry for a minute. Add the garlic and saute for 5-7 minutes. Grind this mixture along with the tamarind paste and salt.
In a frying ladle, heat the oil for the tempering. Add the mustard. When the mustard splutters, add the curry leaves. Add this to the ground paste.

Mix the thuvayal with some rice. Add a little ghee if need be. Make small balls of the mixture and enjoy each thoroughly.


October 20, 2010

Molaga Bajji (Chilli Fritters)


I am back here after a really long hiatus. I missed this space and missed my interactions with my fellow bloggers. This is the longest I have been away from this blog. Quite a few of you dropped by to ask if I was OK. Thanks everyone. We just relocated to a new country and I am taking my time settling down. I will resume regular cooking as soon I have my kitchen set up. In the meanwhile, I hope to get to work on some of the really old recipes that are lying in my drafts.

One such recipe which is perfect for a rainy afternoon or evening is the humble molaga bajji. I have walked along the Elliot's Beach very often, taking in the aroma of these delights, but I have to admit, I never did muster the courage to try the stuff.

I attempted to make these once and did everything possible to reduce the heat of the chillies. I deseeded them and then dropped them in boiling water for 5 minutes.


6 large Chillies, slit, deseeded and boiled in hot water for 5 minutes

For the stuffing:

2 Potatoes, cooked and mashed
1 Onion, chopped finely
2 tbsp Coriander Leaves, chopped
2 tbsp Roasted Peanuts, coarsely ground
1/2 tsp Amchur
1/2 tsp Coriander Powder
1 tsp Cumin Powder
1/2 tsp Garam Masala
1 tsp Chilli Paste
Salt to taste

For the Batter:

1/2 cup Gram Flour (Besan)
1/4 cup Rice Flour
1 tsp Cumin Seeds
1 tsp Chilli Powder
1/2 tsp Turmeric Powder
1/4 tsp Asafoetida
Salt to taste
1 tbsp Hot Oil

Oil for frying


Mix all the ingredients for the batter. Add enough water to make a thick batter.

Mix all the ingredients for the stuffing. Stuff the chillies with the potato mixture.

Heat the oil in a kadhai. Dip the stuffed chillies in the gram flour batter and drop carefully into the oil. Deep fry the bajjis until they turn golden brown all around. Drain on absorbent paper and enjoy.

Do let me know how you like your molaga bajjis.

August 3, 2010

Cherry Polka Dot Cake


Life isn't all just one flavour. It would be terribly boring if it were. The people that make our lives what they are come in all shapes and sizes, not to mention flavours. Some people are themselves very sweet at times, a tad sharp at others and every meeting with them leaves you with a strong memory. This cake is very representative of someone just like that.

1/2 cup Flour
1/2 cup Whole Wheat Flour
1/2 cup Sugar

1 1/2 tsp Baking Powder

Pinch of Salt

1/2 cup Milk

1/4 cup Oil

1/2 tsp Vanilla Essence

1 Egg, beaten

1/2 cup Cherries, deseeded and halved


Preheat the oven to 350F (180 C).


Prepare an 8 inch cake tin by greasing it and dusting it with flour.

Sift the flour with the baking powder and salt.


In a mixing bowl, add the egg, milk, sugar, oil, and vanilla essence. Beat well together. Add the flour mixture to this and blend well. Pour the batter into the prepared cake tin. Arrange the cherry halves on top of the batter. Bake for 30 minutes or until a knife/skewer, inserted into the centre of the cake, comes out clean.

Get ready to enjoy the sweet and tart flavours of this cake.

For all the sweet and sometimes tart times that we've shared in the years we've known each other, here's wishing you a very Happy Birthday, S.

July 6, 2010

Karatya Song


Bitter Gourd! Most people hate it. Some people love it. I am one of those very few people who are indifferent to it. I can't profess undying love for the vegetable. I can never bring myself to say I don't like it. I can't  even relate to either group of people.

I have never stopped looking for recipes that are simple and use bitter gourd. Simple only because S won't touch the vegetable. And I can't do an elaborate routine just for myself, right? (For those of you who're new to this blog, I am about the laziest person you will ever come across.)

After success with the Batata Song, I decided to try this. S has been a weekend spouse for most part this summer and I conned a wholesale vegetable vendor into selling me just 4 baby bitter gourds. The result of these two seemingly independent incidents is this dish.


4 Baby Bitter Gourds, sliced and steamed
4 Onions, sliced
1 tbsp Tamarind Paste
2 tsp Red Chilli Paste
1 tsp Jaggery, grated
1 tbsp Oil
Salt to taste


Heat the oil in a kadhai. Add the onions and fry for 5-10 minutes, until the onions are evenly browned. Add the tamarind and chilli pastes. After a couple of minutes, add the bitter gourd, jaggery and salt. Add a little water. Cover and cook for a few minutes. Remove the lid and cook for another 2-3 minutes.


This is about the best way to eat bitter gourds. With some hot rotis and a bowl of cold curd, you're all set to have a lovely meal.

June 28, 2010

Rajma Lobia Matar Pulao


It was one of those days. I had the day off and S had to be at work (on a Saturday). Since it was a no-rush day for me, I offered to drop him at work and also told him that I’d make hot lunch and bring it to the office at lunch time. (That way, I didn’t have to rustle something up in a hurry before he left.) On the way back home, I had some bank errands to run and I used all that time to figure out what I could cook. I even decided to have lunch with a friend. But that friend had other plans. She wanted to visit the Book Fair. Now, I wanted to go too, but I’d promised S hot lunch. I had not only promised to take lunch for S, I’d also promised to take lunch for everyone in the office who was forced to work that day. I thought I had all morning to cook, but as it turned out, my friend was leaving for the book fair within the hour.


I rushed home and bought a tub of Jeera Raita from the store within our complex. I had no idea what I was going to do. When I entered the kitchen, I saw some black eyed peas on the counter that I’d soaked that morning. I decided to make a pulao with those and serve it along with a raita. I opened the fridge to bring out some tomatoes and I remembered the cooked kidney beans that I’d stashed away in the freezer. I also found a bag of green peas. So, I made a sort of “everything in it” pulao. Very impromptu, very tasty (hearsay – I didn’t get to taste even a little) and very simple, given the ingredients I had at hand. Here is the recipe if you’re making it for 2-3 people.


1 cup Basmati Rice, washed and drained

1 cup Red Kidney Beans (Rajma), soaked overnight and cooked

½ cup Black Eyed Peas, soaked for 2 hours

½ cup Green Peas

1 Onion, finely chopped

½ cup Tomato Puree

1 tbsp Oil

1 tsp Cumin Seeds

1 2” stick Cinnamon

3 Cloves

2 tsp Ginger-Garlic-Chilli paste

½ tsp Turmeric

½ tsp Chilli Powder

Salt to taste


Heat the oil in a pressure pan and add the cumin seeds. When they crackle, add the cinnamon and cloves. Add the onions and fry for a minute. Add the garlic-chilli-ginger paste and fry for 3-4 minutes. Add the salt, turmeric and chilli powder and fry for another minute. Add the tomato puree and allow the entire mixture to boil.


Add the rice and allow the mixture to coat the grains. Add the kidney beans, black eyed peas and green peas. Add 2 cups of water and cover and cook for 2-3 whistles.


Open the cooker when the pressure is released and fluff gently with a fork. Serve with a raita.


While the pulao was cooking, I chopped a couple of tomatoes and a cucumber and mixed them along with the contents of the Raita tub. The pulao was transferred into one box and the raita into another. The boxes were delivered to S along with the car and the car keys. And I left with my friend for a fun filled day at the fair.

June 6, 2010

Cocktail Pizza (and more plagiarism)


Snacks and healthy. I wonder if the two words go together. Most snacks tend to be fried and I've tried baking instead of frying. It works often, not always.

I came across these eggplant pizzas somewhere on the web and thought that the idea was fantastic. I didn't bookmark it and recreated it at home from memory. Later, when I found the recipe again, it turned out I had followed it to a great extent.


Recipe (adapted from here)


1 large Brinjal, sliced into discs
3/4 cup Pasta Sauce
1/4 cup Cheese, grated
2 tbsp Olive Oil


Brush the brinjal slices with some olive oil and roast in a hot oven (400F) for 5 minutes on each side.


Spread a little pasta sauce on each slice and sprinkle with some grated cheese.


Return to the oven and bake for 10-12 minutes, until the cheese is bubbly.


Serve as a snack with tea or as a starter with drinks. This dish will have everyone (all brinjal lovers) asking for more.


I just came to know that this blogger called Nisha Yadav, who blogs at http://esyrecipes.blogspot.com/, has copied some of my recipes word for word, along with the pictures. A friend pointed out that my recipe for Vegetable Dalia Upma (http://chefatwork.blogspot.com/2009/02/vegetable-dalia-upma.html) was copied by her here (http://esyrecipes.blogspot.com/2010/01/vegetable-dalia-upma.html). When I browsed through her blog, I found another recipe of mine, Mixed Vegetable Poha (http://chefatwork.blogspot.com/2008/01/mixed-vegetable-poha.html) copied on her blog (http://esyrecipes.blogspot.com/2010/01/mixed-vegetable-poha.html). I also found several posts picked straight off Anusha Raji's blog, Talimpu.


I think all her recipes are lifted from somewhere. I have left a comment on the blog posts and I hope she removes the content. Please do check her blog out and see if you find any more copied recipes.

May 31, 2010

Lemon Rice


While I have made Lemon Sevai reasonably often, I haven't made Lemon Rice as much. I tend to stick to making it only on Pongal or during the "Aadi Maasam" (if I remember). Now, I make it when we have people over for a meal. In these parts, a South Indian meal is not complete if there is no lemon rice. I have seen lots of people eat lemon rice with sambar. I don't think of it as a great combination. Sambar goes with Pongal or plain rice very well, not with Lemon Rice.


1 cup cooked Rice


Juice of 1 Lime
1/4 tsp Turmeric Powder
Salt to taste


For the tempering:


1 tsp Oil
1/4 tsp Mustard seeds
1/4 tsp Asafoetida
7-8 Curry Leaves
1/4 tsp Urad Dal
1/4 tsp Chana Dal
1 Red Chilli
2 Green Chillies, slit
1 tbsp Cashews, roughly broken
2 tbsp Peanuts


Mix the lime juice with the salt and turmeric powder.


Heat the oil in a kadhai. Add the urad and chana dals. When the urad dal begins to change colour, add the mustard and asafoetida. When the mustard splutters, add the curry leaves, peanuts, cashews, green chillies and red chilli.Take it off the stove and allow to cool a bit. Add the lime-turmeric mixture to this.


Pour the lime juice -tempering mixture over the rice. Mix well and serve with some vadams.


The rice for this dish should not be soft. Sometimes, I cook the rice with a little turmeric and few drops of oil, and add less water than I would for a regular meal. So, a ratio of 1:2.25 for Sona Masoori rice would work very well. Spread the cooked rice on a plate and allow it to cool so that it doesn't get mushy. The dish tastes best when the grains of the rice are separate.