Google
 

May 27, 2011

Lemon Ricotta Pound Cake


I am enjoying every minute of living in Singapore. I have not yet stopped going crazy at the grocery stores and keep finding things that had, until now, existed only in the cookbooks. I did have access to Ricotta Cheese and Mascarpone even in Gurgaon, but this is different. I have bought a can of evaporated milk though I can't remember which recipe had asked for it. That's how crazy I've become. I am the proverbial kid in a candy store.

I also like the deals that come up in supermarkets. Anything that is approaching its expiration date or best before date is sold at reduced prices. I wonder what they do in India. It is something I never thought of before. I found a tub of Ricotta Cheese selling at 1/5th the original price because it was "expiring" the next day. I always wanted to make a Lemon Ricotta Cake and so I bought it. This cake was made the very next day. I have only worked with lime in India and it is a pleasure to work with lemons here.

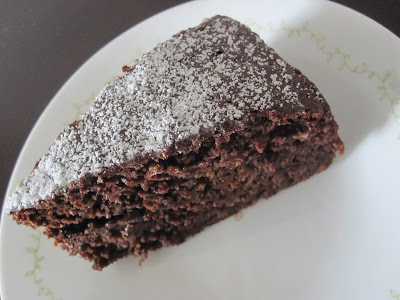
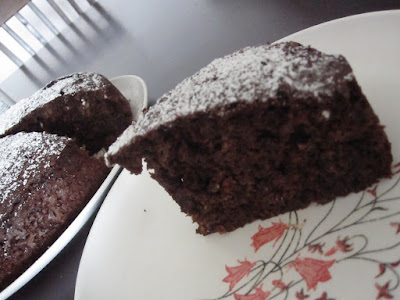
I found a recipe for an Orange Pound Cake by Giada on the Food Network site. I modified it and made this Lemon Ricotta cake. I baked with butter after ages and so so loved the texture of this cake. I know I will make it whenever Ricotta goes on sale!


1 1/2 cups Cake Flour/Plain Flour
2 1/2 tsp Baking Powder
1 tsp Salt
3/4 cup Butter, room temperature
1 1/2 cups Ricotta Cheese
1 1/2 cups Sugar
3 Eggs
1 teaspoon Vanilla
3 Lemons, zested
Icing sugar, for dusting
Butter and Flour/Spray for preparing the cake tin


Preheat the oven to 180C/350F. Prepare a 10" round tin. (I used a springform ring mould.)

Sift the flour with the baking powder and salt.

Cream the butter with the sugar and ricotta until the mixture is fluffy. Add the eggs, one at a time, beating well after each addition. Add the vanilla and lemon zest and beat well. Incorporate the dry ingredients into the batter, adding a little at a time.

Pour the mixture into the cake tin and bake for 40-45 minutes or until a knife inserted into the cake comes out clean. Allow the cake to cool a little and sieve the icing sugar over it.

Cut into slices when warm and just dig in. Memories of an era gone by will come rushing back.

May 23, 2011

Capsicum Rice


This weekend saw a lot of cooking as I had invited two friends from my college days over for dinner. One of them has two children and the older child loves baking. I had never really taught a child how to bake anything and I had a great time making chocolate brownies with the girls. For dinner, we had Bisi Bele Huli Anna, Coconut Sevai, Lemon Sevai, Cucumber Pachadi, and Carrot Peanut Kosumbari. For starters, we had some potato wedges and pizza.

One of my friends stayed over and we had more fun on Sunday too. I woke up this morning thinking of college and all the fun that we had back then. I decided to make Capsicum Rice for lunch today as that is a dish I learnt from another classmate's mother. It is a simple recipe, but it is always a great hit.


1 cup Basmati Rice, cooked
2 Green Capsicum, seeded and finely chopped
2 Onions, finely chopped
1 tsp Chilli Powder
1 tsp Turmeric Powder
1 tsp Cumin Powder
1 tbsp Oil
1 tsp Cumin Seeds
1/4 tsp Mustard Seeds
1/4 tsp Asafoetida
7-8 Curry Leaves
Salt to taste


Heat the oil in a kadhai. Add the mustard seeds. When they splutter, add the cumin seeds and asafoetida. When the cumin crackles, add the curry leaves. Add the onions and saute for 2-3 minutes. Add the capsicum and saute for another 2-3 minutes. Add the salt, turmeric, chilli, and cumin powders and stir well. Cover and cook for 4-5 minutes. Mix the cooked rice into the capsicum mixture and cook for another minute.


This is about as simple a dish as you can think of and it tastes great. I have made it often for train journeys and once when I traveled to Bombay to celebrate my aunt's 70th birthday by taking her to a restaurant, she said the best gift I could give her was to make this capsicum rice for lunch. This has to be the most effortless way to win some appreciation.

May 2, 2011

Chocolate and Zucchini Cake


About a couple of years ago, a couple decided to go on an impromptu vacation for a couple of weeks and visit a couple of places. They'd known this other couple in one of the places they intended to visit and had met them before a couple of times. The other couple invited this couple to stay with them. Most everything about the stay is a blur today. The only thing I can remember about my dear namesake and her hubby visiting us was that we had loads of fun. Sometimes the best laid plans go to waste and the best times happen when you put in the least amount of planning. This was one such.

Arundati gifted me this book, Deep Dark Chocolate, during that trip in 2009. I've gone through it a few times but never really tried anything. We had an old friend come over for lunch today and I decided to make this cake. It has a whole host of ingredients and today was one of those days when I had just about everything. I modified the recipe in the book to get this beautiful dark chocolatey cake.

2 Medium Zucchini, grated
2 Carrots, grated
1 1/4 cup Flour
1/3 cup + 1 tablespoon Cocoa Powder
3/4 tsp Baking Soda
1/2 tsp Salt
1/2 cup Sugar
1/2 cup Brown Sugar
6 tbsp Oil
2 Eggs
1/2 tsp Orange Zest
1/2 cup Raisins
3/4 cup Chocolate, roughly chopped

Icing Sugar for Decoration

Grease and line a 9-inch cake tin.

Preheat the oven to 350 F/180 C.

Sprinkle 1/4 tsp salt over the zucchini and carrots and set aside for 30 minutes. Wash well and squeeze dry.

In a bowl, mix the flour, cocoa, baking soda and salt.

In another bowl, mix the oil, sugar and brown sugar and beat well. Add the eggs and beat again for a couple of minutes. Fold in the dry ingredients and mix until well blended. Add the zucchini-carrot mixture, raisins, orange zest and chocolate bits.
Pour the batter into the prepared pan and bake for 35-45 minutes or until a knife inserted into the cake comes out clean.
 

Allow to cool. Dust the icing sugar all over the cake. Cut into wedges and enjoy with a cup of coffee or with a scoop of vanilla ice cream.

This is a great way to get anyone to eat their vegetables. I knew there was zucchini in the cake because I put it in. But quite like my chocolate beetroot mini muffins, nobody else could even make it out. This would have to be one of the most moist and chewy chocolate cakes I've baked.
I thought of you, Arundati, the entire time I baked this cake and would like to share a slice with you and with everyone who has been a part of this blog.
The Singing Chef turns 4 today! And I couldn't have done it without all of you. Thank you for your continued support.

April 20, 2011

Blueberry Muffins


When we first moved to Singapore, I was dumbstruck by the variety of produce that I saw in the markets. The wet markets, the supermarkets, and the gourmet stores were all filled with every kind of fruit and vegetable. Yes, I'd read about most things, especially since I started blogging. But to see them for real was something else. I was literally the kid in a candy (err... fruit and vegetable) store. I mean, this was the real deal.

A wrong diagnosis during my pregnancy in India led to thinking that I may be developing gestational diabetes. Fortunately, there was no such thing and it was the result of a badly administered glucose tolerance test. But there was a time lag between the wrong diagnosis in India and the correct diagnosis in Singapore. I wanted to be extremely careful and stayed away from most things sweet. I relished the fruits as they were, but didn't dare to use them in baking. I could (and still can) do without the excess sugar and fat.

But now I have an oven. I have the produce. And I do make the time. I have been reading a lot of my cook books to see what I can make with what I get here. I found a packet of blueberries in the supermarket and they were a lot cheaper than they usually are. So, I came home with a packet. I found a great recipe in Nigella Lawson's "How to be a Domestic Goddess", modified it a wee bit and made these beauties today.

1 1/3 cup Flour
2 tsp Baking Powder
1/2 tsp Baking Soda
A pinch of Salt
6 tbsp Oil
1 Egg
3/4 cup plus 2 tbsp Buttermilk
1/4 cup Sugar
1/2 cup Blueberries

Preheat the oven to 400F (200C).

Line a 12-muffin pan with muffin cases.

In a bowl, beat the egg. Add the oil, sugar and buttermilk and whisk together.

In another bowl, sift together the flour, baking powder, baking soda and salt. Make a well in the centre of this mixture and pour in the liquid ingredients. Fold the dry ingredients into the liquid lightly until it all comes together. Fold in the blueberries and mix gently.

Scoop the mixture into the muffin cases and bake for 15-20 minutes or until a toothpick inserted into the muffins comes out clean.

These are light, not cloyingly sweet and would be perfect for breakfast. With some butter and jam!

April 12, 2011

Pav Bhaji Buns


I have resumed baking and suddenly there's no stopping me. I was going through the recipes on this blog and decided to make some stuffed buns since Amma had been mentioning them for a while. I couldn't decide which kind of buns to make.

I remembered that S once ate Vada Pav at the Bombay airport and he told me the vada had been baked inside the pav. I thought that was a great idea. The more I thought about it, the more I felt that Pav Bhaji would be as good a candidate for something like this as Vada Pav was. The idea took shape in my head and soon the buns were taking shape in my hands.

We enjoyed this mess free "pav bhaji" for dinner tonight.

For the dough:
3 cups Bread Flour
3 tbsp Oil
3 tbsp Fresh Yeast/1 Envelope Active Dry Yeast
3 tbsp Sugar
11/2 tsp Salt
1/2 cup Boiling water
1/2 cup Milk
1/4 cup Coriander Leaves, chopped

For the filling:
 
1 large Potato, washed and chopped finely
1 Onion, finely chopped
1/2 Capsicum, finely chopped
1/4 cup Cauliflower, finely chopped
2 tbsp Carrot, finely chopped
2 tbsp Beans, finely chopped
2 tbsp Peas
1 tbsp Tomato paste
1 tbsp Oil
1/4 tsp Garlic Paste
1 tsp Chilli Powder
1/2 tsp Turmeric Powder
1 tsp Cumin-Coriander Powder
1 tsp Pav Bhaji Masala
Salt to taste

Take a huge mixing bowl and place the oil, salt and sugar in it. Add boiling water and mix until the sugar dissolves. Add the milk now to bring the mixture to room temperature. Add the yeast and mix well. Add the flour, coriander leaves, onion-garlic mixture and knead into a dough. Place the dough in a greased vessel and cover it with a damp muslin cloth. Allow to rise until double in size (roughly 45-50 minutes).
 
Knead the dough for a minute and then divide into 16 equal portions.

For the filling:

Pressure cook the peas along with the chopped carrots, beans, cauliflower and potato. Drain.

Heat the oil and add the onions and garlic paste. After a few minutes, add the capsicum and fry for another 2-3 minutes. Add the tomato pasteand fry for a few minutes. Add the other vegetables, salt, chilli, turmeric and cumin-coriander powders. Add the pav bhaji masala and fry for 2-3 minutes. Cover and cook the mixture for 4-5 minutes. Remove the lid and cook until the mixture is dry.

To Proceed:
 
Preheat the oven to 400F.

Take a portion of the dough and spread it on to your palm. Place some stuffing in the centre and bring the edges and seal. Place on a greased baking sheet or tray. Repeat with the other portions.

Allow to rise for 50-60 minutes and then bake for 12-15 minutes.

Cut the buns in half and spread a little butter on them. Enjoy them hot.

This turned out to be the easiest way to eat "Pav Bhaji" sans the mess. I suppose one could mix chopped onions and coriander along with the bhaji and then stuff it into the dough for a more authentic street side experience.

April 6, 2011

Gulab Jamun


Gulab Jamuns. I think of them of little dumplings of goodness. While I can't stand the cloyingly sweet store bought ones, I love the ones that are made at home. I have to stop myself from eating too many of these whenever Amma makes them.

She made them today and we had them after lunch. All I needed was one bite and I was transported to kingdom happiness. I even remembered that this blog has been neglected for too long. Never before has this blog gone for 3 months without a single post. But this was not without reason.

S and I are blessed with a baby boy. Our own little dumpling of goodness entered our lives 8 weeks ago. Needless to say, life hasn't been the same since. Like Amma's gulab jamuns, I can't seem to get enough of him.

Here's a simple recipe that never fails to satisfy:

200g Khoa
A pinch of Salt
A pinch of Soda Bicarb
1/2 cup Flour

For the syrup:

1 cup Sugar
1 cup Water
1/4 tsp Rose White Essence or Cardamom Powder


Oil for frying


Heat the oil.


Knead all the ingredients into a dough. Shape the dough into balls or oblongs and fry in the hot oil.

Make a syrup with sugar and water and bring to a boil. Do not make it very thick or attempt to bring it to any thread consistency. Add either the rose essence or the powdered cardamom.

Add the fried balls into the syrup. Allow them to soak a little and enjoy them.
 
I am glad to share news of the new arrival with all of you. Please have some gulab jamuns to celebrate the good news. 

January 6, 2011

Sweet Potato Pesto Cutlets


The new year is here. And my only wish is that it is a good year for each and everyone of us. We began 2010 with friends at a hill station and hoped that the year would have a lot of travel. I must admit, I felt a little cheated in this regard. Not only did we not travel all that much, the few trips that I did have planned, I had to cancel for different reasons. Yet, even on that front, I did travel to my favourite cities in India: Bangalore, Madras and Hyderabad. And eventually moved to settle down in my second most favourite city in the whole world. So, while I do feel a little cheated, on the whole, the year turned out just fine.

Coming to this post. How do you like to spend your weekends? My ideal weekend would be one where I wake up at leisure and find breakfast ready whenever I do. I like to laze around more during the day and just have different meals magically appear at different times of the day. But we all know that is not how most weekends of mine turn out (or any for that matter).

On days when we wake up closer to lunch time, I try to make a full south Indian meal for the first meal and then like to make something "snacky" for later in the day. The decision about dinner is usually left for later. Here's one such snack idea. It is perfect as a snack and can even double up as a meal.

2 Sweet Potatoes, boiled and peeled
1 Potato, boiled and peeled 
2 slices Bread, crumbled
1/4 cup Soya Granules, prepared according to the instructions on the pack
2 tbsp Parsley Peanut Pesto
1/4 tsp Chilli Powder
Salt to taste

Oil for frying

Mash the sweet potatoes and the potato together. Add the crumbled bread slices and the soya granules and mix well. Add the other ingredients. Make small balls of the mixture and flatten each to form a cutlet.

Heat a frying pan and place the cutlets in the pan. Add a few drops of oil around the cutlets. Cook for 2-3 minutes on one side. Turn over and cook the other side for a couple of minutes, adding a little oil if necessary.

Drain on absorbent paper and serve with some tomato or chilli sauce.

This was the first time I cooked with yellow sweet potatoes. We enjoyed the cutlets and I'm sure I'll be making these babies again.

Happy and Healthy 2011 all of you!