Google
 

Friday, August 31, 2007

Patrodo

There are dishes that give me mental fatigue. That is only to say that just thinking about making the dish makes me tired, because in my mind the process is a lengthy one. Patrodo is a perfect example.


We had the colocasia leaves growing in our garden when I was a child. Every once in a while, we'd go through the routine of cutting the leaves, making the masala or massol as it is called in Konkani. H and I would always be assigned the job of destemming the leaves. What fun! More fun because we could play the blame game whenever a leaf was cut or got beaten beyond repair. We would cut the stem by marking a V at the base of the leaf and then string the leaves. After this we would lightly beat the veins using a rounded smooth stone.


I made this when I found colocasia (taro) leaves at the INA market. It is much simpler than I imagined. The result is superb and so the work that goes into it feels like nothing at all.


Ingredients:


7-8 Colocasia (Arbi) Leaves
1/2 cup Rice
1/2 cup Dal
7-8 Red Chillies
1/3 cup Coconut, scraped
1/4 cup Tamarind Paste
1 tsp Turmeric Powder
1 tsp Asafoetida
2 tbsp Jaggery
Salt to taste


For the tempering:

1 tbsp Oil
1/4 tsp Mustard Seeds
1/4 tsp Asafoetida
7-8 Curry Leaves

Soak the rice and dal together for at least 4 hours.


Destem the leaves and flatten the veins using a rounded stone.


Grind the rice and dal together along with all the other ingredients except the leaves.


Place the largest leaf on a clean surface, smooth side down and smear the paste over the leaf.


Place the next leaf over this in such a way that the tip of the leaf is near the base of the one below.


Smear the paste over the leaf and place another pointing in the opposite direction and proceed in the same manner until you have used the smallest leaf.


Fold the sides of the leaves inwards and smear more paste. Roll the leaves in a swiss roll like manner and tie with a string.


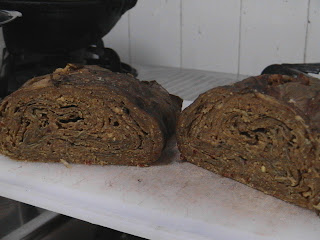
Steam cook this bundle in a cooker without using the pressure for about 30 minutes. When done, it should look like this.


Cool completely and cut into slices after removing the string.


To proceed, heat the oil in a kadhai. Add the mustard seeds and asafoetida. When the mustard splutters, add the curry leaves. Add the slices of patrodo and fry for a few minutes allowing the slices to crispen.

Amma says that there are variations here. The slices may be deepfried or toasted on a tawa. I like my patrodo with tadka and I love it with rice and dali saar.

You could adjust the tamarind paste int he recipe to suit your taste. The tamarind helps remove the itchiness that these leaves cause. Also, the leaves with purple stems cause less itching than the ones with green stems.


The partodo rolls may be made in advance and frozen. When you are ready to eat them, bring them out from the freezer, thaw them and then proceed. I have yet to make the final dish. Am saving the rolls in my freezer for an evening when I return from NOIDA so tired that all I want to do is eat dali saar and fry patrodo. And believe that all is well with the world.


Rice being the one of the ingredients here, I am also sending this entry to Jihva for ingredients started by Indira of Mahanandi and hosted by Sharmi of Neivedyam.


As this is a Konkani dish, I am sending it to Asha for the RCI Karnataka, an event started by Laksmi that celebrates the regional cuisine of India.

Thursday, August 30, 2007

Avakaya Rice


There are ways and ways to use up leftover rice. I recently tried the Fried Rice from Jugalbandi and I am glad I have one more way to use up rice.


S made this with leftover rice one day when I was out for lunch and I would love to have it again.


2 cups cooked Rice


3 tbsp Avakaya Pickle gravy


1 Onion, sliced


1 tsp Oil


1/4 tsp Mustard Seeds


1/4 tsp Asafoetida


4-5 Curry Leaves


Salt to taste


Mix the rice and the avakaya pickle. Add some salt if necessary.


In a kadhai, heat the oil. Add the mustard seeds and asafoetida. When the mustard splutters, add the onions and fry for 2 minutes. Add the rice mixture and fry for a few minutes.


Enjoy this with some curd on the side.


Off this goes to the Jihva for ingredients event started by Indira of Mahanandi and hosted by Sharmi of Neivedyam.


Avakaya or Aavakaaya is a traditional pickle from Andhra Pradesh, S's home state. You can read more about it here. The main ingredient in the pickle is aava or mustard which gives the pickle its famous pungent kick. So, this also goes to Sunita for her monthly event Think Spice... Think Mustard.

Wednesday, August 29, 2007

Jeera Kotambarya Chitni (Cumin Coriander Chutney)


This is the chutney that I made to go with my Appeys. My strongest memories of eating Appeys with this chutney take me back to Bangalore. My aunt, at whose place I spent many vacations, used to dish out one type of dosa after another. (So many that even the ardent dosa lover in me would hope for a different item at the breakfast table!) So appeys would be that very very welcome change.

This is a very simple chutney and it goes very well with Appeys.


Ingredients:


1 tsp Cumin Seeds

1 tsp Coriander Seeds

1/3 cup scraped Coconut

3-4 Red Chillies

1 tbsp Tamarind Paste

Salt to taste


Grind all the ingredients to a fine paste using a little water.


There you go... Konkani cooking is really simple, isn't it? This chutney from the kitchens of South Canara or Dakshina Kannada goes to Asha as my third entry for the RCI Karnataka event.

Tuesday, August 28, 2007

Appey


Ever since Nupur mentioned that her mother brought her a couple of Appey Patras or Appey Kaylis, I've been meaning to get one for myself. And when we went shopping for vegetables, I found the pan along with a muffin pan and bought them both.


Ingredients:

1/2 cup Urad
1 cup Rice (Boiled or Raw)
1 tsp Fenugreek Seeds
Salt to taste

Oil for frying


Wash the urad and rice. Add the fenugreek seeds and soak in plenty of water overnight. (At least 4-5 hours). Wash well and grind using a little water. Add salt and water to dilute it as required. (Don't add too much water as the appeys will not turn out well.)


Heat the appey kayli and smear a drop of oil onto each mould. Simmer the flame and pour a spoonful of the batter into each mould.


Turn each ball after a few minutes using a pick.


The appeys should look like this.


You can now do one of two things.


  1. Ogle at the appeys and take loads of pictures.

  2. Eat them when they are piping hot.


I enjoyed them with a Cumin Coriander Chutney. The recipe will come as another post.


As this is a Konkani dish, I am sending it to Asha for the RCI Karnataka, an event started by Laksmi that celebrates the regional cuisine of India.


Rice being the main ingredient here, I am also sending this entry to Jihva for ingredients started by Indira of Mahanandi and hosted by Sharmi of Neivedyam.

Monday, August 27, 2007

Beans Upkari

This is a very simple preparation and it is served at every wedding. I'd infact gotten so tired of eating this at weddings that I told Amma, "If this is served at my wedding, I'll order a pizza!" Somehow that story spread within my family and folks took it to mean that I didn't like this vegetable.


I make this in a pressure pan and so this is ready in no time. A perfect hit with sambar and dali saar alike.
1/4 kg Beans, strung and cut into 1/2 inch pieces
1 tsp Oil
1/4 tsp Urad Dal
1/4 tsp Chana Dal
1/4 tsp Mustard Seeds
2 Red Chillies
1/4 tsp Asafoetida
1 tbsp Coconut, scraped
7-8 Curry Leaves
Salt to taste

Heat oil in a pressure pan. Add the urad and chana dals, mustard seeds and asafoetida. When the mustard splutters, add the curry leaves and the red chillies. Fry for a minute. Add the chopped beans and the salt along with a little water. Cover and cook for one whistle.

When done, open and cook without the lid to let the excess water evaporate. Add the coconut and mix well. Serve as a side dish with rice and Dali Saar or Sambar.

This also goes to dear Asha as yet another entry for the RCI Karnataka event.

Carrot Kosumbari


It is here. RCI Karnataka! Finally! I missed the RCI Tamilnadu event as I was very new to the blogging world at the time. I could have, with S's help, participated in the RCI Andhra event, but I was still reasonably new and thought that participation in food blogging events was only by invitation. Silly me.


Now, I know better. And I even saved up the stuff that I cooked right through August just so I could send them all to dear Asha, the hostess of RCI Karnataka. All through the next 30 days, you will mostly see recipes from Amma's kitchen, lovingly passed down from mother to daughter generation after generation.


For those of you who may not have read my original introduction, and are confused with the many states that I represent within India, I'm half Konkani (maternal) and half Tamil (paternal) and am married to a Telugu. I have lived all over India in the years since I left home (Madras) in 1997 and the city (town/village??) I now call home is Gurgaon. I have a tendency to call a lot of places "my own" and would consider myself Indian above all else. Home cooking for me is very global, but for this month, I am going to showcase a lot of Konkani recipes. (It does help a LOT that I will be at home with Amma starting tomorrow until Sunday evening.)


I'm starting my flood of entries to Asha with a simple carrot salad. Koshimbir, kosumalli, call it what you will. This dish is ready in minutes and is nutritious and tasty all at once.


Ingredients:

2 large Carrots, grated
1/4 cup Moong Dal, washed
2 tbsp scraped Coconut
1 tsp Green Chilli-Ginger paste
Salt to Taste
Coriander leaves for garnish

For the tempering:
1 tsp Oil or Ghee
1/4 tsp Mustard Seeds
1/4 tsp Asafoetida
7-8 Curry Leaves


Place the washed moong dal in a large bowl. Add the chilli-ginger paste, carrots, salt, and scraped coconut and mix well.


In a small kadhai, heat the oil or ghee, add the mustard se
eds and asafoetida, and when the mustard splutters, add the curry leaves. Add this to the carrot mixture.


Garnish with coriander leaves and leave aside for 5-10 minutes. Enjoy it as a side dish with rice and dal.


This goes to Asha with loads of love as my first entry to RCI Karnataka, an event started by Laksmi t
hat celebrates the regional cuisine of India. My earlier posts celebrating Konkani Saraswat cuisine have been:


Tomato Saar


Tandlya Roti Ani Lasnye Chitni


Biscuit Roti


Ambya Sasam


Rasayan


Tendlya Talasani


Sabudana Khichdi


Batat Phow


Bread Upkari


Chhollia Ghasshi


The sole Karnataka (non Konkani) dish that I have posted earlier is


Akki Roti


I am sure there'll be a lot of participation in this event. I'm off to Madras tomorrow for a lot of reasons. It's Rakshabandhan (no, it's not exactly a festival for us - Bhau Beej after Diwali is) tomorrow. My dear friend and ex-neighbour is getting married on the 30th. And my parents celebrate their 44th wedding anniversary on the 1st of September. So I'm going to have a lovely time with my folks.


Saturday, August 25, 2007

Dahi Nadia


When Swapna announced the RCI: Oriya Cuisine event, I thought to myself, "Even though I've had Oriya friends and colleagues, I have never learnt much about the cuisine of the state. I read Bijoylaxmi Hota's interview in The Hindu when she released her book Healthy Oriya Cuisine along with her daughter, Kabita Pattanaik.


Soon after reading the article which talks about acidic and alkaline foods, I met a lady who had spent all her life in Orissa, though she was originally from Bengal. I asked her about Oriya cuisine and I was rather shocked when she said, "There's nothing great about Oriya Food." I left it at that. If I didn't like something I'd say that I didn't like it. I think each cuisine has its own flavours, tastes and hues.

Anyway, my research told me that the cuisine has so much in common with other state cuisines. I found recipes of things like were similar to the aloo bonda (batata vada) and one sweet dish that was the adirasam of Tamilnadu. I found this recipe on Oriya Kitchen which has an uncanny resemblance to the Tayir Pachadi of Tamilnadu.


Ingredients:

1/2 Fresh Coconut(grated)

2 green chillies

1 cup Curd

small piece of Ginger

4-5 Curry leaves

1tbsp Sugar

Salt to taste

Punch phutan

1tbsp oil

Process:


Beat the curd properly. Add the sugar, salt and coconut to the curdand keep aside in a bowl. Cut green chillies and ginger into small pieces.


Heat oil in a frying pan. Add punch phutan and allow it to splutter. Add curry leaves, ginger and green chillies and fry them little bit. Add the seasoning to the curd mixture.


This is being rushed to Swapna as today is the last date for the RCI: Orissa event. Happy hosting Swapna.

Thursday, August 23, 2007

Ragda Patties and an Award


I didn't realize I had to go on this trip to Mukteshwar. I knew I was supposed to go, but then, given all the confusion with the new office, I thought that the trip might have been cancelled or postponed. But my boss made it very clear to me that it was on as per schedule.


S travels quite a bit on work and I've gotten used to his trips (which fortunately have come down a great deal these days) but I've never had to travel on work since the time we started living together. Until this last weekend. (I do take off to spend time with Amma Appa every once in a while - but that doesn't count!!)


So, just before I left on this trip, I wanted to make something special for S. I'd been talking of Ragda Patties for ages now and our friends even invited us over on Tuesday for a nice evening with Ragda Patties and Pani Puri to celebrate the eve of I-Day. I'd some leftover Vatana Ambat in the fridge. (The recipe for Vatana Ambat will come out only after the RCI Karnataka starts - yes, I am finally getting smart!) S insists that the Vatana Ambat wasn't leftover. He insists I saved some so I could make Ragda. Well, it doesn't matter, does it?


I asked our friend's mother for the recipe and she gave it to us. But when my time to came to make it, I decided to try it on my own.


Ragda:


1 cup Yellow peas, soaked and cooked
2-3 Onions, chopped
3-4 pods of Garlic, chopped
1 tbsp Ginger-Chilli-Garlic paste
2 tbsp Oil
2-3 Tomatoes, chopped
1 tsp Turmeric Powder
2 tsp Chilli Powder
1 tsp Garam Masala

1/2 tsp Pav Bhaji Masala
Salt to Taste


To serve:
2 Onions, chopped

Heat 1 tsp of oil in a kadhai and fry the onions. When the onions turn brown, add 1-2 pods of garlic, chopped. Add the ginger-chilli-garlic paste and fry for 2-3 minutes. Cool this mixture and grind to a fine paste.
Heat the remaining oil. Add the remaining garlic and fry for a minute. Add the ground paste and fry until the oil separates from the paste. Add the turmeric powder, chilli powder, pav bhaji masala and garam masala. Add the chopped tomatoes and fry for 2 minutes. Add plenty of water and salt. Add the cooked peas and simmer for 10-15 minutes. Mash the mixture a little and add some chopped coriander leaves if you like.


Patties:


For this, I mostly followed Amma's recipe for Aloo Tikki. My friend had made them like cutlets, so I coated my patties with bread crumbs and shallow fried them instead of deep frying.


4 Potatoes, boiled and mashed
1 tsp Chilli Paste
1 tsp Ginger Paste
1/4 cup Coriander, chopped
2 slices of bread

Bread crumbs for coating
Salt to Taste
Oil for shallow frying


Soak the slices of bread in water for a couple of minutes and squeeze the water out.

Mix the potatoes, chilli and ginger pastes, coriander and salt. Add the bread slices. Form small balls using this mixture and flatten them a little. Coat these patties with bread crumbs and shallow fry them on a hot skillet using a few drops of oil, cooking them on both sides.


To Proceed:


Place the patties on a plate. Pour the ragda over these. Top with chopped onions and enjoy the dish.

There have been a lot of awards going around and two of my friends, Richa and Srivalli awarded me with this title.


Thanks girls. I didn't expect it and it came as a pleasant surprise. Thanks a ton.

It does feel like everyone I might want to pass this on to has already been given this award. But I'd like to pass this on to the people who have ensured that this blog lives and thrives. The people who encouraged me when I was a newbie. There are lots more and this should go out to all of them. So, please treat this only as an illustrative list and not an exhaustive one.

Nupur

Nandita

Anita

Asha

Sia

Sharmi

Seema

Sig

Jai and Bee

Coffee

Trupti

Jeena

And Sreelu thought I was being such a tease when I said I was jumping off a cliff in the Himalayas over the weekend. So, just to remove any doubt, here's a picture.


I'll write more about this when I pen my Random Thoughts. That's my other blog: the other side to me.

Wednesday, August 22, 2007

Almond Raisin Muffins


Breakfast. The meal that I consider the most important of them all. I can skip any other meal and not feel the pangs as long as I've had a hearty start to my day.


Breakfast usually consists of a cup of coffee, a glass of juice or milk and poha, upma, eggs, dosa, bread. On occasion, I make pancakes and we have them with maple syrup. But elaborate breakfasts are meant for special occasions like weekends or birthdays.


What was special this time around? Well, several things. We completed 11 months of being married on Saturday. But we weren't together on that day as I was out camping in the Himalayas, jumping off a cliff, climbing a rock and doing a lot of other rather strenuous things. And I was cut off from the rest of the world. Even from S. And I had no idea that he was running a temperature. When I got back, I was really in no condition to cook anything elaborate. But the next day, I thought I had to make something really special to make up for everything and help S feel good.


It was just then that I saw Strawberry Muffins on Sharmi’s blog and I knew I just had to make them for breakfast. But I didn't have strawberries at home. I thought I'd use my strawberry crush. But then I remembered the stuff I used to have for breakfast at Barista when I was working in Gurgaon: Almond Raisin Muffins and a Latte. We'd just bought a packet of raisins and I had a packet of almond slivers which I received from Canada. I modified the recipe I found on Sharmi's blog to make these fluffy, absolutely out of this world muffins.


Ingredients


3/4 cup Milk

1/2 cup Vegetable oil

1 cup Raisins

2 cups Flour

1 cup Sugar

1 tbsp Baking Powder

1 Egg

1/4 tsp Salt


Topping


Almond Slivers


Place all the ingredients except the raisins and almonds in a food processor jar fitted with the dough blade. Run the food processor for 2 minutes until the ingredients form a batter.


Grease 12-muffin pan.


Blend the raisins into the batter and pour spoonfuls of the batter into the muffin moulds. Sprinkle the almond slivers on top and bake in a hot oven (400 F) for 20 minutes.

Enjoy these with a cup of coffee and get set for a great day.


Muffins form part of an American breakfast and this goes to Glenna of A fridge full of food who is hosting this month's Weekend Breakfast Blogging # 14, the theme of which is Ethnic Breakfast. WBB is the brainchild of Nandita of Saffron Trail.

Wednesday, August 15, 2007

Egg Roast


I used to make only one type of egg curry all through, but I almost never tried making the different ones. Stuck to curry for a long time. (I haven't yet posted that here.) As with most of my recipes, I learnt that one from Amma. But over the years, I've enjoyed eating the various types of egg curries from the Kerala style to the Punjabi style to even an Oriya egg curry, but when it came to cooking, I stuck my tried and tested recipe. I first modified that to make this yellow Egg Curry a few months ago.

My friend and former colleague, Anandhi, also known as B to all of us, used to bring a dry egg roast in her lunch box a couple of times a week and I almost always polished it off. I never tried recreating that dish until earlier this week.

I am, however, not quite sure if that was the dish I recreated. My office has temporarily shifted to NOIDA which means that I now travel across 3 states to get to work. And retrace my steps when I return. That also means that I am, most of the time, too tired to cook anything elaborate at night. The first day that I undertook this journey, I came back exhausted. I quickly boiled 4 eggs and made this. I remembered that Cinnamon's Egg Curry had been posted only recently and that seemed quite similar to Anandhi's. But too tired also means too tired to browse the net. But my memory seemed to have remembered the ingredients to a large extent.

I boiled and peeled the 4 eggs and then put them in the freezer to cool down.

Ingredients:

4 Eggs, boiled, peeled and cut in half
1 large Onion, sliced
1 tsp Chilli Powder
1/2 tsp Turmeric Powder
1 tbsp Cumin Powder
1 tsp Cumin Seeds
1/2 tsp Coriander Powder
1/2 tsp Garam Masala
1 tbsp Oil
1/4 tsp Asafoetida
1 tsp Chilli Ginger-Garlic paste
Salt to taste
Coriander leaves for garnish

Heat the oil in a heavy bottomed sauce pan. Add the cumin seeds and the asafoetida. When the seds crackle, add the onion slices and fry for a minute or two. Add the chilli-ginger-garlic paste and fry for another minute. Add the cumin powder, coriander powder, chilli powder and turmeric powder and fry for a few minutes.

Add the salt and garam masala and fry again for a minute. Add about 1/3 cup of water and cook the onions till most of the water disappears. Add the eggs and cover and cook for a couple of minutes. Turn the egg pieces around so that both sides are covered with the spices and get cooked evenly.


Remove from the fire and garnish with coriander leaves. Enjoy this with rotis or rice, or even with toasted bread as we did that evening. I was really too tired to even make rice.

Cumin is the most dominant spice in this dish. I absolutely love cumin and can use it in just about anything. So, I am extra glad that Sunita chose Cumin as the spice of the month for her event Think Spice... Think Cumin.


I am rushing this off to her as my entry to this event. I will not be blogging for the next few days and will not be able to reply to any comments. But I will do that as soon as I am back on Monday. Have a good weekend, keep blogging and see you when I get back from the Himalayas.

Tuesday, August 14, 2007

Tropical Cupcakes


Sig wins! It is her event after all, but yes, she guessed it right. I did bake a cake. Correction. I baked several mini cakes.


We did a lot of shopping on S's birthday. Apart from things for him and things for me, we bought things for the kitchen and the blog specifically. We got some nice ceramic stuff at throwaway prices and I bought a few just to photograph my food in. We also found muffin pans that fit my microwave. I don't have the luxury of a cooking range in this house and so we bought a microwave-grill-convection-combination oven and I never found muffin pans that fit. So when I found those at the I.N.A. market along with the Appey Kayli (special pan to make Appeys), I went ahead and just bought them.


I modified the Golden Glow Cake recipe to come up with this recipe. I thought of all the tropical flavours that I could pair Litchi with. I decided to use coconut and pineapple as I thought these would go well with the litchi flavour.


I used:

1 cup Flour
2 1/2 tsp Baking Powder
1/2 cup Demerara Sugar
1/2 tsp Salt
1/4 cup Oil
1 egg
1/4 cup Cocount Milk
1/2 tsp Pineapple Essence

1/4 cup Litchi Juice


Sift all the dry ingredients for the cake together into a food processor jar with the dough blade. Pour in all the liquid ingredients and run the processor for 2 minutes.


Prepare muffin pans by first smearing a little butter all over the cups and then dusting them with flour.


Divide the batter equally between the pans and bake for 15 minutes at 350 F. The cakes are done when a knife or skewer inserted into them comes out clean. Remove the cakes from the tins and cool completely.


Pour a little Litchi Sauce over these cupcakes when you are ready to serve them. They taste divine. I just replaced milk with a combination of coconut milk and litchi juice, the sugar with demerara sugar, the butter with oil and the vanilla essence with pineapple essence. What I was left with was a very 'tropical' cake batter.

We've enjoyed these fresh out of the oven and also after they went cold. I didn't think I could just replace ingredients to suit my preference (or that of Sig's!!). But guess what? I actually could. And the end result was simply divine.


Hopefully, this will be the last dessert I make for some time. Given that we're just two people, and ones who don't need dessert, I will stick to normal healthy food for the next few weeks.


So, this is another entry to the A Fruit A Month (AFAM) event hosted by Sig of Live to Eat.

Monday, August 13, 2007

Litchi Sauce and a Guessing Game


The season's been over a long time now. But Sig chose this fruit over all others after the season was over. At least here in India. And when there are so many fresh fruits available in the markets (and on the roadside), I really didn't feel like picking up a can of litchi. The markets are lined with melons, peaches, pears of all varieties and apples, so I stock up on those and bring them with me in my "fruit box".


This is one of the reasons I love summer. Let me rephrase that. This is one of the sights I love during summer. This picture was taken when S and I were on a weekend trip to Mussoorie. These litchies were huge and the seed inside was almost non existent. What more can one ask for?

Season or no season, we always Litchi Crush at home. This way, we can savour the flavour of the fruit long after the season has ended. So, I thought I could use that. Sig did allow it, so why not? But apart from using it as a mixer for vodka, or just making juice, I'd never done anything with the crush.


When I was researching for the AFAM Orange event, I came across lots of recipes that called for orange sauce. So I decided to make a Litchi sauce. I must admit I don't even remember where I came across this recipe. I didn't bookmark it because what I wanted to make for the event didn't require orange sauce.

Ingredients:

1/2 cup Water
2 tsp Cornflour
2 tablespoons Icing sugar
2 tbsp Litchi Crush

Mix the corn flour with a little cold water. Add this mixture to the water and sugar. Allow this to boil for 5 minutes. Add the crush and blend.


Depending on the consistency you want, spreading or pouring, you can alter the water and cornflour ratio.


I am fairly certain that I can pour my sauce over pancakes and give myself a little treat instead of using the usual maple syrup. But do come back tomorrow to see what I really did with this Litchi Sauce. I haven't made pancakes yet, so I haven't yet tried that. Keep guessing. I'll be back.


Needless to say, this is my first entry to the A Fruit A Month (AFAM) event hosted by Sig of Live to Eat. Considering the fact that we just finished birthday week with loads of sweetmeats, I was fairly certain that a certain someone would either leave or make me leave. But he had a little surprise waiting on the table when he got home. And he asked for seconds before I could ask how it was. So, there... I had my answer.

Sunday, August 12, 2007

Spaghetti with Tomato Cheese Sauce


A meal that is about as simple as can be: Spaghetti. I sometimes tend to think of Spaghetti as being more American than Italian. Quite the same way as I think of Pizza.


While I was introduced to Macaroni in the comfort of my own home, Spaghetti was a whole new experience. The first time I saw it was on the supermarket shelves in upstate NY. But I didn't pay much attention to it. Think about it: an 8 year old from India in the US for a very first time, despite the fact that her parents spent a lot of time there, in fact met there and decided to get married, walking through the aisles of the supermarket, taking in everything from Mars to Juicy Fruit to more cheese and vegetable varieties than she even knew existed. Spaghetti would hardly have been the thing to draw her attention.


But when Amma brought home a can of Spaghetti and cooked it on a day when only H and I were having lunch (my parents skip one weekday meal as a way of giving thanks - they belong to very opposite cultures and married at a time when marrying on your own was taboo enough, let alone marrying someone outside your homestate, culture and clan.) I think I was hooked since then.


Here is the simplest way to make Spaghetti at home. (Apart from buying readymade sauces!!)


150g Spaghetti
2 tsp + 1 tsp Olive Oil
2 Onions, ground to a paste
1 tbsp Garlic Paste
200g Tomato Puree
1 tsp Oregano
1 tsp Basil
1 tsp Parsley
1/2 tsp Chilli Flakes
1-2 slices Low Fat Cheese
Salt and Pepper to taste
Cheese Powder for serving


Heat the 2 tsp Oil. Add the onion and garlic pastes and fry for a couple of minutes. Add the chilli flakes, parsley, basil and oregano and fry for a minute. Add the tomato puree and allow the mixture to boil.


Boil 2 litres of water with a little salt and 1 tsp oil. Add the spaghetti to the boiling water and cook for 10 minutes. Drain.


Add the cheese slices to the sauce and stir briskly till it blends well. Add salt and pepper to taste.


To serve:


Serve some spaghetti on a plate. Pour the sauce over it. Sprinkle with cheese powder and enjoy.


We were watching "The Pursuit of Happyness" and I actually made this in fifteen minutes between parts one and two. I like the fact that with stuff like tomato puree so readily available, even an "exotic" dish takes little effort.

I am sending this to Paige from Chef Girl will be hosting the Weekend Cookbook Challenge for August. Paige has chosen a super theme - Dinner and a DVD.

Friday, August 10, 2007

Mushroom Rolls


After that series of regular Indian fare, I tried some more baking. There was some more chitchatting with Mr. Yeast. I told him how glad I was to have him back in my life and he told me he was glad too. He did think that 21 years was an awfully long time to be abandoned and unloved, but he promised not hold that against me. Having settled all that, we got down to work.

I wanted to try an all flour bun. I just wanted to see how it would turn out if I were to try to recreate the bakery stuff at home. But I couldn't get nice pictures as I baked them at night. I have white light in the kitchen and the bathrooms, nowhere else. And the lighting in the other rooms is through shades, so it doesn't help any. I can't use the flash as it would just spoil the picture.


And I saved one to take a picture, especially for Anita, who wanted to see what the bun looked like when cut. But it looks like I saved the worst one of the lot for the picture. But the little rolls were out of this world. I didn't think that I could make something so soft. The rest we almost polished off last evening and S took a couple to work. (His colleague called me and asked me to quit my HR work and start a bakery or catering unit.)


I experimented a great deal. Not with the flour this time. But with the dough. The result was great. The feeling was, "Why did I not try before?"


Ingredients:


For the dough:


1 1/2 cups Flour
1 1/2 tbsp Yeast
1 1/2 tbsp Oil
1 1/2 tbsp Sugar
3/4 tsp Salt
1/4 cup Water, boiling
1/4 cup Milk
1 cube Cheese, grated

1/2 tsp Parsley
1/2 tsp Chilli Flakes


For the stuffing:


6-8 Button Mushrooms, finely chopped
1 Onion, finely chopped
1 tsp Oil
1 tsp Chilli flakes
1/2 tsp Thyme
1/2 tsp Parsley
2 pods Garlic, finely chopped
Salt and Pepper to taste


For the topping (optional):


4 Olives, quartered lengthwise
1 cube Cheese, grated


For the dough:


Take a huge mixing bowl and place the oil, salt and sugar in it. Add boiling water and mix until the sugar dissolves. Add the milk now to bring the mixture to room temperature. Add the yeast and mix well. Add the flour, cheese, parsley and chilli flakes and knead into a dough. Place the dough in a greased vessel and cover it with a damp muslin cloth. Allow to rise until double in size (roughly 45-50 minutes).


Knead the dough for a minute and then divide into 16 equal portions.


For the filling:


Heat the oil, add the garlic and onions and fry for a minute or two. Add the parsley, thyme and chilli flakes and fry for a minute before adding the mushrooms. Add salt and cover and cook for 4-5 minutes.


To Proceed:


Take a portion of the dough and spread it on to your palm. Place some stuffing in the centre and bring the edges together and seal. Place an olive quarter on each roll and sprinkle some cheese on top. Place on a greased baking sheet or tray. Repeat with the other portions.


Allow to rise for 50-60 minutes and then bake in an oven at 400 F for 12-15 minutes.


I was going to make some pasta so we could have these rolls with dinner. So much work in one day: Sacrilege!! And to add to it, S looked at the rolls and said, "We'll just eat these. Ditch everything else." The Miss Lazy hiding inside me couldn't argue, could she?


These rolls are off to Scott from Real Epicurean for the Weekend Herb Blogging, started by Kalyn.

Thursday, August 9, 2007

Strawberry Trifle Pudding


There are days when you set out to make something and you end up making something else. And then there are those days when you want to make something, but you're not quite sure what that is. S's birthday was one of those days for me. I knew I was going to make a nice cake. I knew I would have some portions of cake. But I had no idea what to do with them.


A long time ago, I had made chocolate rum balls with cake leftovers. But chocolate cake, chocolate balls. That would have been a little too much for us to take. I wanted to make a layered dessert. After seeing Meeta’s Strawberry Mirror Cake, I wanted whatever I was making to have a strawberry jelly layer on top.


But halfway through the exercise, I changed my mind and created my own trifle pudding. I mean if those guys at restaurant buffets can serve me anything in the name of Trifle, why can I not cheat myself?


Ingredients:


2/3 cup Cake slices

5 tbsp Strawberry Crush (I used Mapro)

2 tsp Gelatin

3 tbsp Strawberry Custard Powder

3/4 cup Milk

2 tsp Sugar


Arrange the cake slices in a baking dish. Pour 2 tbsp of Strawberry Crush over them and bake for 15 minutes at 350F.


In a small bowl, mix the custard powder with about 2 tbsp of milk. Bring the rest of the milk to boil with the sugar. Add the custard powder misture to the boiling milk while stirring continuously. Boil this for a minute and set aside. After 5 minutes, pour this mixture over the cake slices and allow to set in the fridge for an hour


Dissolve the gelatin in a little warm water and add this to 2/3 cup of boiling water. Add the remaining strawberry crush and
mix well.

Pour this jelly over the custard cake mixture and allow to set for a couple of hours in the fridge.


Cut into slices and serve. I had some left over jelly which I froze. I enjoyed my trifle with the frozen jelly pieces.


Why did my pudding not turn out the way I'd expected? Because I didn't wait for the custard to set fully before pouring the hot jelly over it. But that did nothing to affect the taste. S isn't too fond of jellies so I've been treating myself to a little slice every 2 days.

Wednesday, August 8, 2007

Drumstick Sambar and Raw Banana Curry


So many things that I have posted are one dish meals. But Mallugirl’s post made me think. Amma always made a full breakfast and a full lunch before leaving for work. In fact, at dinner time, all we had to do was make fresh rice. Nothing is as difficult as we make it out to be. We live in better times to some extent than our mothers did. We have access to hygienically packed, processed foods. Although we had a food processor and a cooking range at home, a microwave came only ten years ago into Amma's kitchen. I remember Amma making paruppu usli by grinding the soaked dal on an ammi made of stone. I have trouble bringing my Ultra Grind out and Amma made Idli and Dosa batter on a stone kal oral. Then she got a wet grinder. For all its automation, it was still what I'd consider cumbersome.


A lot of people ask me why I don't hire a cook or just eat out. A friend asked me about a month ago, "Why are you so bullish about cooking your own food? I leave all that to my maid. Stop being so adamant and finicky about cooking. You're a working woman. Learn to enjoy life."


Enjoy. The word can convey so many feelings at once. I don't like dancing and I've been told I don't know how to enjoy life. What is this thing about doing a particular thing in order to enjoy life? Should it not be about doing what I want? I've been a full time working woman for 8 years now. Eight complete years as of today. And in all this time I've cooked my own meals. I have a LOT of support from Amma. I get ready made sambar and rasam powders, tamarind paste, scraped coconut, vangi bhat masala, bisi bele bhat masala, ginger, chilli and garlic pastes, paruppu podi, thengai podi, yellu podi, karuveppilai podi, milagai podi, yennai katrikkai podi, pitti chitni and loads of other things from her. No kidding! And with so much that she untiringly does for me, what I do with the things she lovingly makes for me is almost nothing. But what is more important to me is the fact that I enjoy cooking.


My lunchbox during my school days used to be an elaborate 4 container tiffin carrier. Top most for the vegetable, then sambar-rice, rasam-rice and curd-rice. Amma was a working woman. Yet, she didn't make the kind of stuff that I do (put everything in a cooker and forget it!) She didn't have the luxury of frozen cut vegetables or ready made ginger-garlic pastes. Yet she dished out one healthy meal after another for as long as I've known her. And she continues to do so.


This morning's meal, I owe entirely to her (as I do almost everything.) It is during such rushed mornings that I am especially thankful for the 5 cookers I have received as gifts from her over the years. There is no waiting for the pressure to release so you can cook the next item.


A trip to the I.N.A. market allows you to not only buy exotic ingredients, but ordinary things that you crave. Drumsticks, raw bananas, shallots, sweet potatoes, amaranth leaves, taro leaves... the list is endless. Our trip on Sunday was successful. We brought back a lot of much missed vegetables.


Today being a working day, our meal had to be ready in 30 minutes. And it was. So, this is a totally unplanned entry to Mallugirl’s Express Cooking challenge. The picture was taken just when I sat down to lunch. (I am working from home for the moment.)


The meal comprised:


Drumstick Sambar (Murungakkai Sambar)
Raw Banana Curry (Vazhaikkai Karumadhu)
Rice
Curd
Papad


Ingredients:


Drumstick Sambar:


1/2 cup Toor Dal
1 tbsp Sambar Powder
1 Drumstick, cut into 3-inch long pieces
3 Onions, sliced
2 tsp Oil
1/4 tsp Mustard Seeds
1/4 tsp Asafoetida
7-8 Curry Leaves
1/4 tsp Fenugreek Seeds
1 Green Chilli, slit
1 Red Chilli
4 tbsp Tamarind Paste
Salt to Taste


Rice:

1 cup Ponni Rice
3 cups Water


Raw Banana Curry (Vazhaikkai Karumadhu):


4 large or 6 medium Raw Bananas, peeled and cubed
1 tbsp Oil
1/4 tsp Mustard Seeds
1/4 tsp Asafoetida
7-8 Curry Leaves
1/2 tsp Urad Dal
1/2 tsp Chana Dal
1 tsp Chilli Powder
1/2 tsp Turmeric Powder
1 tsp Sambar Powder
Salt to taste


How do you put it all together in 30 minutes?

Get the bananas out and peel and chop them.

Cook the rice and dal in a pressure cooker using 2 vessels. Add 3 cups of water to the rice and 1 cup of water to the dal.


When the rice and dal are getting cooked, proceed with the sambar.


Heat oil in a pressure pan. Add the mustard seeds and asafoetida. When the mustard splutters, add the curry leaves, fenugreek seeds, red and green chillies and fry for a minute. Add the onions and fry for a minute and then add the drumstick pieces. Add the sambar powder and fry for a couple of minutes more. Add a little water and cover and cook with the weight for 1 whistle. When the pressure is released, add the tamarind paste and salt and bring the mixture to a boil. Add the cooked dal and simmer for 5-10 minutes.


When the drumstick is getting cooked, you can get the raw banana curry going.


Heat the oil in a kadhai. Add the urad and chana dals. When the urad dal begins to change colour, add the mustard and asafoetida. When the mustard splutters, add the curry leaves and the raw banana pieces. Add the chilli, turmeric and sambar powders. Mix well and cover. Allow to cook for 5-10 minutes. Remove the lid and allow the pieces to crispen on all sides.
To proceed, place 2 appalams (papads) in the microwave on high for 40 seconds. Bring out the curd from the fridge. Set everything on the counter or the table. Then bring the appalams out. Eat like there is no tomorrow. Just kidding.

So, this goes to Mallugirl’s Express Cooking challenge as my final entry. My earlier entries to this event have been


Among my 100+ entries so far, a significant number would be quick meals. Maybe it is a sign of the times we live in, maybe it is a sign of my laziness. Here's a list of quick meals on The Singing Chef that didn't become a part of Mallugirl’s Express Cooking challenge:

Taro-Rice Balls with yogurt dip


What do you do with leftovers? Left over curry, left over rotis, left over rice. I always try to do something. And I’m always looking for ideas. Some years ago, while I was at a Gujarati Restaurant in Hyderabad called Indian Harvest, my thali had a rather unusual fried snack. Small cutlets made with cooked rice and spices. I tried making the stuff at home and they turned out very nice.

Taro Root (Colocasia) is made in several ways in Tamil cuisine. I have talked about Seppankizhangu Karumadhu(Colocasia Curry) and the Seppankizhangu Mor Koottu earlier. The third way is to deep fry cooked taro root pieces smeared with spices. I had some left over curry and decided to convert it into the deep fried version on S’s birthday. But I also had leftover rice. And I didn’t know what to do with that. And what do I make to complete the meal?

It struck me just then. I thought, “Why not combine a Gujarati snack and a Tamil side dish into one?”

Ingredients:

1 cup Seppankizhangu Karumadhu
1 cup Cooked Rice
1 tsp Chilli Powder
½ tsp Turmeric Powder
¼ cup Flour
Salt to taste
Bread crumbs or Rava to coat
Oil for deep frying

If you don’t have the ready made curry, you can use cooked taro root and increase the salt, turmeric and chilli powder accordingly.

Mash the taro root curry along with the cooked rice. Add the salt, chilli powder and turmeric powder. Make small balls out of this mixture.

Mix the flour with a little water to make a thin paste.

Roll the balls in this paste and coat with breadcrumbs.

Heat the oil in a kadhai and deep fry these balls till they turn golden brown.

Drain on a slotted spoon over another small vessel so that this oil can be reused.

Yogurt dip:

1 cup Curd, beaten
½ Cucumber, grated
1 Onion, chopped finely
½ tsp Chilli Paste
½ tsp Ginger Paste
½ tsp Chilli Flakes
¼ tsp Oregano Flakes
Coriander leaves for garnishing
Salt to taste

Mix all the ingredients well. Garnish with coriander leaves. I got the idea of using oregano and chilli flakes from Nandita’s entry for WBB#12.

And since this becomes a complete meal in itself and is ready in way less than 30 minutes, this goes to Mallugirl’s Express Cooking challenge.


Rice being used here, I am also sending this entry to Jihva for ingredients started by Indira of Mahanandi and hosted by Sharmi of Neivedyam.

Kabuli Pulao and Raita


Chhole Chawal and Rajma Chawal are staples across Delhi. Some of the best places where I’ve eaten these would be Nehru Place and Connaught Place. I’ve probably made Rajma once in my life. And after an overnight soak and 15 whistles in the cooker, my rajma was hard as ever. Since I was only cooking for myself back then, I endured it. Chhole, however, is another saga altogether. I have made it many times and in several different ways. Amma even has a zero oil recipe which I shall post soon.

I soaked chick peas to make chhole but ended up making yet another rice dish. It is almost like chhole chawal, except that the masala is slightly different and the rice is cooked along with the chhole.

200g Chick peas, soaked overnight
2 Onions, sliced
2 tbsp Tomato Puree
1 tbsp Oil
½ tsp Cumin Seeds
½ tsp Asafoetida
1 tsp Chilli paste
½ tsp Ginger-Garlic paste
1 tsp Green Chilli paste
½ tsp Turmeric Powder
1 tsp Pav Bhaji Masala
Salt to taste
1 cup Basmati rice

Heat the oil in a pressure pan. Add the cumin seeds and asafoetida. When the cumin crackles, add the onions and fry for 2 minutes. Add the chilli paste and the ginger garlic paste and fry for another minute. Add the chilli and turmeric powders along with the pav bhaji masala and fry for a minute. Add the tomato puree and salt. When the mixture bubbles, add the chickpeas and rice. Stir well. Add 2 cups of hot water and cook for 2 whistles.

When done, garnish with coriander leaves and enjoy it with some raita.

This raita is ready within minutes.


Chop an onion and a tomato finely. Add a finely chopped green chilli to a bowl of curd. Add salt and beat well. Add the onion and tomato pieces. Garnish with coriander.

If you have soaked chick peas on hand, this meal is ready in 25 minutes flat. And it has a good mix of carbohydrates, proteins, fat and a share of vegetables too. So, this goes to Mallugirl’s Express Cooking challenge.


Rice being the main ingredient here, I am also sending this entry to Jihva for ingredients started by Indira of Mahanandi and hosted by Sharmi of Neivedyam.

Seppankizhangu Karumadhu (Colocasia Dry Vegetable)


There are comfort foods and there are comfort foods and then there's seppankizhangu karumadhu. I love eating hot rice with sambar or rasam over it and loads of this vegetable on the side.

People think it is gooey and itchy and a lot of things. I think it's heavenly. I mean, how can something so simple be so tasty. A staple in my dad's side of the family, my mom's side uses the leaves to make patrodo, but never uses the root. I made this when my cousin and his family came over for dinner last week. And everyone loved it. And everyone wanted to "help" and ran the spoon over the curry to "mix" it, so the resultant curry was a mash. But when I browned it evenly, it didn't seem to matter.

Ingredients:

1/2 kilo Colocasia, cooked and peeled.
1 tbsp Oil
1/4 tsp Mustard Seeds
1/4 tsp Asafoetida
7-8 Curry Leaves
1/2 tsp Urad Dal
1/2 tsp Chana Dal
1 tsp Chilli Powder
1/2 tsp Turmeric Powder
Salt to taste

Chop the colocasia into small discs. Apply salt, chilli powder and turmeric powder and keep aside.

Heat the oil in a kadhai. Add the urad and chana dals. When the urad dal begins to change colour, add the mustard and asafoetida. When the mustard splutters, add the curry leaves and the colocasia pieces. Mix once and cover. Allow to cook for 5 minutes.

Remove the lid and allow the pieces to crispen on all sides. Do not mix it too many times as you the risk of mashing the entire dish into one big mass. Enjoy this with sambar or rasam rice.

Tuesday, August 7, 2007

Garlic and Sage Bread


I have overcome my fear of yeast. And how!! I was eyeing the recipe for cheese and potato bread in the book "Favorite Vegetarian Dishes" after my success with the masala buns. I asked S what kind of bread I should bake and he instantly said, "garlic".


I should have known. Both of us love the taste of garlic in our food and I sometimes add it in recipes where the recipe doesn't call for any. S's colleague keeps asking me to not use it because he doesn't like it. But then, S and I need to be catered to as well, right? Every once in a while I make an utterly garlicky dish and today is one of those days.


I had to modify the recipe of the Garlic and Sage Bread that I found in the same book. I continue to be completely out of normal flour. The recipe calls for dry yeast and my fruit buns used the same thing. I'd much rather use fresh yeast. Especially since I brought back a huge packet of the same from the I.N.A. market on Sunday. And I can't be bothered to go find fresh sage. And last, but not the least, I have no idea what sea salt is. I also decided to add some cheese for the garnish which didn't seem like a very good idea when the bread was ready. But then it is hindsight that is 20:20.


Ingredients:


1 1/4 cup Whole Wheat Flour/ Atta
1 1/2 tbsp Fresh Yeast
3 tbsp Sage
2 tsp Salt
3 tbsp Chopped Garlic
1 tsp Honey
2/3 cup Water, tepid
1/2 slice Low Fat Cheese, cut into strips (optional)


In a large mixing bowl, add the water, honey and 1 tsp salt. Mix well. Add the yeast and dissolve completely. Add the sage, wheat flour and 2 tbsp garlic and mix well to form a dough. Turn the dough on to a floured surface and knead it for 5 minutes.


Place the dough in a covered greased bowl and allow to rise in a warm place until double in size. (60-90 minutes.) Knead again for a couple of minutes and then shape into a circle. Place the dough on a greased baking tray and allow to rise for another 30 minutes. Sprinkle the remaining garlic and salt over this ring. Place the cheese strips over the dough and bake in a preheated oven at 400F for 25 minutes.


Cool completely on a wire rack before cutting.

This bread is very crusty on the outside but soft on the inside. I think I am going to make some soup to go with it tonight. It also seems like the ideal bread to make crostinis or bruschettas.


I'm enjoying this new phase in my life. The one in which I befriended Mr. Yeast. I have a long list of things I want to make. And high in terms of priority is Amma's handmade pizza. I plan to try that with whole wheat flour as well. Anita’s blogpost on whole wheat potato bread has tips for substituting wheat flour for flour. This has opened up so many possibilities. Thanks Anita.


My first bread making experiment is off to Melissa from Cooking Diva for this weekend's Weekend Herb Blogging, started by Kalyn.

I have to thank my dearest friend Shobha for her interest in bread making. Long before I entered the world of food blogging, Shob's emails about the bread she made with pictures got me interested in this art.

Monday, August 6, 2007

Masala Buns


I have always maintained that food blogging makes you do things you probably wouldn't have otherwise. I usually reserve Saturdays for posting my week's recipes. Last Saturday, for a change, I browsed and browsed and then browsed some more. I didn't really cook during the day. I made myself a nice salad and had it with some soup. And then got back to browsing. My mouth was watering as I saw the pictures on Sharmi’s blog and I kept digging deeper until I came to her Tangy Cilantro Spirals. At that point I had to turn away because the temptation was a little too much. I wanted to grab a bite then and there. It was pouring cats and dogs and I really wanted to have some tea and eat a spiral or two. The perfect weather for that!


Since I knew I couldn't, I moved away. Away from her blog. And went to Anita’s blog. I went into her archives. I was fairly pleased with my baking efforts of the previous day and went into her bread section and landed on her post about bagels. There I was... drooling all over the pictures. Then it was too much for me. How much can a poor girl take? I just sat there thinking about how cruel the world can be, especially these two wicked ladies. Creating delicious stuff that I can't pick up and put in my mouth.


I'd brought back 2 packets of yeast from Madras and have been wanting to make Amma's handmade pizza for ages. I ended up making the French Bread Pizza, for which I didn't have to touch yeast. Now, why do I fear yeast? Because I tried making fruit buns when I was in Class 4. And they were a complete disaster. So, while I've watched Amma make the perfect pizza for years now, I never got around to even as much as trying.


That afternoon, after a really sugar high friday (cake and trifle pudding, more cheesecake at the restaurant), I wanted something savoury, something chatpata (tangy). Off I went to my bookshelf and pulled out the Ann Pillsbury Baking Book. I found a recipe for dinner rolls. I was too scared to modify it, but I had to.


  1. I didn't know how much "1 cake" of compressed yeast was.

  2. I didn't have much flour left.

  3. I didn't want dinner rolls. I wanted chatpata stuff.

So, I combined whole wheat flour along with my flour and used as much yeast as I thought I needed to. When the buns were baking, we invited our friends for dinner and so all of use enjoyed the buns with drinks and dinner.


Ingredients:


For the dough:


1 cup Flour


1/2 cup Whole Wheat Flour


1 1/2 tbsp Oil
1 1/2 tbsp Yeast
1 1/2 tbsp Sugar


3/4 tsp Salt


1/4 cup Boiling water


1/4 cup Milk


For the filling:


1 large Potato, washed and chopped finely


2 Onions, finely chopped


2 tbsp Capsicum, finely chopped


1 tbsp Carrot, finely chopped


1 tbsp Beans, finely chopped
1 tbsp Oil
1 tsp Cumin Seeds
1/4 tsp Asafoetida
1 tsp Chilli Powder
1/2 tsp Turmeric Powder
1 tsp Cumin-Coriander Powder
Salt to taste


For the Topping:


2 cloves Garlic, finely chopped


1 tsp Chilli flakes


1 tsp Sesame Seeds

For the dough:

Take a huge mixing bowl and place the oil, salt and sugar in it. Add boiling water and mix until the sugar dissolves. Add the milk now to bring the mixture to room temperature. Add the yeast and mix well. Add the flours and knead into a dough. Place the dough in a greased vessel and cover it with a damp muslin cloth. Allow to rise until double in size (roughly 45-50 minutes).


Knead the dough for a minute and then divide into 10 equal portions.


For the filling:


Heat the oil, add the asafoetida and cumin seeds. When the cumin crackles, add the chopped onions and fry for a minute before adding the other vegetables, salt, chilli, turmeric and cumin-coriander powders. Cover and cook for 4-5 minutes.


Mix all the ingredients for the topping together.


To Proceed:


Take a portion of the dough and spread it on to your palm. Place some stuffing in the centre and bring the edges and seal. Roll in the topping mixture and place on a greased baking sheet or tray. Repeat with the other protions.


Allow to rise for 50-60 minutes and then bake in an oven at 400 F for 12-15 minutes.


Enjoy these buns fresh out of the oven.


Since these buns are a meal in themselves, and they are non messy, they are very good companions for the lunchbox and definitely make for good company while on a picnic. So, I am sending taking these on my picnic with Anupama for our share of fun in the sun.

Sharmi and Anita: you've been great inspirations for this experiment and more. A big thank you.

Achari Aloo


Cook in haste and repent, err, eat, at leisure.

Almost all my meals are express meals. I mean, when you travel 75 minutes or more one way, work for at least 9 hours and then trudge back, and you like to have decent meals on the table, you enjoy cooking, and you have a food blog over and above all that. How can any meal be leisurely (in terms of preparation)? And no, you don't have a cook.

To top it all, when I'd spent a lazy Saturday doing almost nothing, except for attempting some masala buns, S and I decided to invite our good friends over for dinner. So, there I was. With almost no vegetables in the fridge, definitely no time on hand and friends visiting. I made something simple for dinner. Really simple. And as I figured, I was able to whip up an entire meal in just about 30 minutes. So, this goes to Mallugirl’s Express Cooking challenge.

I have the luxury of owning a double storey 4 burner stove and 5 pressure cookers and pans. But please remember that we don't as yet own a dining table and our apartment has a really really small kitchen. So, while I do the make the most of what I have, managing in the little hole is a tad tough.

My meal for the evening comprised rice, Payatham Paruppu Kuzhambu, a variation of Katrikkai Karumadhu, and this potato experiment. Why did I experiment? Because many people, read that as MANY people, are averse to this lovely versatile vegetable called brinjal/aubergine/eggplant. S and I love it and we have it at least once a week in some form. Fortunately for me, our friends T & B enjoyed the brinjal.


Amchi cuisine has a mixed vegetable side dish called chow chow. Left over pickle gravy, called humman, goes into the gravy making the dish a really spicy one. S and I had the same caterer at our offices when I was working in Gurgaon and she supplied us with achari aloo once in a while. Her dish used the fennel flavoured mango pickle in mustard oil. So, using up old pickles seems to be common. I will try that as well some other time as I do have mango pickle from 2 years ago. Thanks to my friend's mom in Ludhiana.


Last winter, the same friend's mother sent a winter pickle for us. It had carrots, turnips, and cauliflower. It is supposed to be consumed within a short span and does not keep for long. But then, we keep everything for as long as it can be used. And so although we did enjoy the fresh pickle in winter, we continue to have it in the fridge.


I decided to pair this pickle with potatoes and the resultant dish was finger licking good.


Ingredients:


4 Potatoes, peeled or scrubbed well

1 tbsp Oil

1 tsp Cumin Seeds

1/4 tsp Asafoetida

1/2 tsp Turmeric Powder

1/2 tsp Chilli Powder

3 tbsp Dry Pickle

Salt to taste


Chop the potatoes into small cubes.


Heat the oil in a kadhai and add the cumin seeds and asafoetida. When the cumin crackles, add the potato cubes, chilli and turmeric powders. Fry for a few minutes. Add the pickle and salt and cover and cook for 15 minutes.


Enjoy this with rotis or rice and dal.


While the potatoes were shedding their firmness, I set the rice in a cooker. That taken care of, I chopped some long purple brinjals and made a simple brinjal curry. Instead of the elaborate Katrikkai Karumadhu, I made the curry with just chilli and turmeric powders instead of the masala. I threw in some yennai katrikkai podi, that Amma had made for me years ago, towards the end. These brinjals seem to cook very fast and the curry was ready in less than 10 minutes.


When the brinjals were simmering, and, in a pressure pan, proceeded to make the Payatham Paruppu Kuzhambu.Instead of cooking the dal separately and then adding the seasoning, I prepared the seasoning in the pan and added the dal and water to it. This, I pressure cooked in about 5-7 minutes.


My entire meal was ready in just about 30 minutes with no prior preparation. With curd and pickles always available at home, it was a complete meal.

Saturday, August 4, 2007

Happy Birthday and a Cake

Well, just as I completed 100 posts and 3 months in the blogging world, it was time to celebrate another 3 event. S completed 3 decades of fun on this planet and we celebrated the day in style. No lavish party or anything, but a little party for two.


I made S's favourite breakfast: an amchi rava dosa called Rulaama Doddak. For lunch, we polished off some reincarnated leftovers. I had the day off (yes, where I work you get paid days off for your spouse's birthday!!) and S left work early. So after a little late lunch, we cut this cake.


I'd been asking around for cake recipes but what I really needed was a frosting recipe. I found a recipe on the Hershey's site and modified it. But although I've been baking for 20 years now, I've hardly frosted any cakes. I made one black forest cake for my brother's 21st birthday and I made a teddy bear cake for my neighbour's grandson when I was in Class 12 I think. I have a long way to go before I master this frosting business. And definitely prefer my cakes to be non frosted. But hey, the husband doesn't turn 30 everyday.


I went back to my tried and tested Ann Pillsbury's Baking Book. And pulled out a tried and tested recipe. And then modified it some.

For the cake:

2 cups Flour
4 tsp Baking Powder
1 1/4 cups Sugar
1 tsp Salt
1/2 cup Oil
2 eggs
1 cup Milk
1 tsp Vanilla

1/4 cup Chocolate chips
Butter and flour for dusting

For the icing:
6 tablespoons butter, softened
1 1/4 cups powdered sugar
1/4 cup Brown Sugar
1/2 cup Cocoa
1/3 cup Milk
1 teaspoon Vanilla

Sift all the dry ingredients for the cake together into a food processor jar with the dough blade. Pour in all the liquid ingredients and run the processor for 2 minutes. Blend in the chocolate chips.

Prepare two 8 inch round cake tins by first smearing a little butter all over the tin and then dust it with flour.

Divide the
batter equally between the pans and bake for 30 minutes at 350 F. The cakes are done when a knife or skewer inserted into them comes out clean. Remove the cakes to a cake rack and cool completely.

Cut the tops of the cakes to make them even.

For the icing:

Beat butter in a mixer jar. Add powdered sugar and cocoa alternately with milk; beat to spreading consistency (additional milk may be needed). Stir in vanilla.

Place one cake and pour the icing over it. Place the second cake over this and cover with icing. You may refrigerate the cake to help the icing set.

I found the icing a little too sweet even though I cut down the sugar content from the original recipe. That could be reason why my icing was a little runny. I made some lovely strawberry trifle with the cake leftovers.

All in all, it was a great day. It was the very first time that someone had actually baked S a cake for his birthday and I am so glad that the first time was mine. It made it that much more special. We ended the day at our favourite restaurant: Earth, enjoying some lovely wine, our favourite mushroom starters, an out of this world thin crust pizza and some delicious spinach and corn canneloni.

Happy Birthday Sachin. I love you.

Friday, August 3, 2007

Cheesy Bread Spread


When Jai and Bee made their post for Earth Food with What's wrong with this picture? this is what I wrote in their comments section:

I was taught from my childhood that I must never waste. It’s a lesson that has been valuable. I cook what I need to, use up the leftovers or give them to someone who can utilize them before they go bad. When I made my paneer in white gravy, I took it over to the neighbours for lunch. There was one serving left in my bowl and the lady of the house was about to throw it when I stopped her. I promptly took it back home and Sachin polished it off that evening. There are enough and more hungry people in the world and I can’t believe that in this day and age people waste food. Is it their way of telling the world that they’ve arrived?


I totally believe that that must be the driver. I meet so many people who say, "Oh my husband won't eat leftovers." Or "I never eat the morning's food in the evening." My heart breaks when I see people throw good food away. I've always cleaned up my plate during a meal. I serve myself exactly what I need. Appa always used to say, "You have no idea how fortunate you are. There are so many people out there who don't know if and where their next meal is coming from.


If each of us was to say that "Save the World" is a campaign that is meant for the big people and not us, our Earth is going to suffer. It is up to us to do the little things that add up to become the big thing. How do I try? By consuming only what I need, trying not to waste, taking the bus instead of driving, giving to charity not what I don't need or can't use, but what the recipient can actually use, buying fresh produce from the local markets, and so on and so forth. It is whatever I can do to make this place a better place to live in. Be it by helping the earth itself, or the people who live in it.


  • I cook rice in a pressure cooker so I don't waste excessive water.

  • If I've cooked dal or a vegetable with more water than I should have, I use the water in my cooking.

  • I try and consume whole fruits and don't discard the peel as far as possible.

  • I use milk cream (even the little bits sticking to the sides of the vessel) either in my cooking or I make butter and buttermilk out of it.

And having grown up in Madras with acute water shortage:

  • I continue to take a bath with half a bucket of water.

  • I don't leave the tap running while I am brushing my teeth.

I keep all windows at home open and try not to use the AC too much.


Eating out is something we take for granted these days. While growing up, we had very few restaurants and having lived inside the IIT campus meant that you had to go outside the campus if you wanted to eat out. And that WAS a big deal.

While I do cook at home most of the time, I must admit that eating out is one of my weaknesses. Be it chat on the roadside, finger food at a lounge or a proper meal at an Italian restaurant, I simply love it.


In the last ten years, ever since I left home, I have been careful with my money to the extent possible. (Even then India Today interviewed us about money issues and told the world that we have only Rs. 189 in our joint account. News that shocked my family more than anyone else.) Eating out, though often, meant that I'd bring any leftovers back with me. I'd either consume the stuff, or give it away. But I can't remember having wasted food.

This is my entry to Meeta's Monthly Mingle.


After an entire week of Eating out while eating in, we were probably tired of it. We wanted to also celebrate ten months of being married. So we ordered some food. The lady who took our order sensed excitement in our voices and told us she'd throw in a little extra subji as a compliment because if we ordered an entire serving, it would be too much for the two of us.


When the delivery boy came, we had a huge packet. We enjoyed the meal of lacchha paratha, naan, achari aloo, paneer tikka and dal makhni. The leftovers were finished over the next day. But she also sent us pickled onions and some green chutney. S's foot was really bad at the time and while I was clearing up, his foot topped the green chutney container. We managed to put away everything else. I didn't know what to do with pickled onions though. I was worried that they'd pass on their fragrance to the other stuff sitting in the fridge.


A couple of days later, I had a very good idea when I was beginning to clear the fridge in preparation of our trip to Manali. It was time for breakfast and I was browsing through the contents of my dearest companion. This is what we had for breakfast that morning.

Ingredients:

1 Tomato, chopped

2-3 pickled Onions, chopped

2 pods Garlic

1 cube Cheese

1 tsp Olive Oil

1 tsp Chilli Flakes

Salt to taste

Combine all the ingredients in a mixer jar and grind to a semi-smooth paste. Spread this over toast for a quick breakfast.


I think I could also add a little milk or water to this and make it a cheesy dip. The flavours blend in really well and the breakfast was neither too sour, nor sweet. It wasn't bland nor spicy. As they say, it was just right!

Thursday, August 2, 2007

Paruppu Urundai (Dal Dumplings) - And a milestone


This is a very special post. Special because it is the third part of the trilogy featuring Milagu Kuzhambu and Milagu Rasam.


Why is the number 3 special? Why a trilogy? Why, why, you ask?


Because today, my food blog turns three. No, not three years, but three months.


So, it had to be a special post. And quite like I'd predicted in Asha's blog, this is my 100th post. This wasn't planned, but boy am I glad it worked out this way.

So, to celebrate my 100th post on the day my blog turns three months, I present to you THE dish that is simple, exotic, comforting and special, all at once.

Ingredients:

1 cup Toor Dal, soaked for 4 hours
1 tsp Chilli Powder
1/2 tsp Turmeric Powder
1/4 tsp Mustard Seeds
1/2 tsp Urad Dal
7-8 Curry Leaves
1/4 tsp Asafoetida
A little rice flour

You will also need 1 recipe of Milagu Rasam to proceed.

Grind the toor dal to a fine paste. Add salt, chilli powder and turmeric powder and blend well into the dal paste.

Heat oil in a kadhai and add the urad dal. When the dal turns brown, add the mustard seeds. When they splutter, add the curry leaves and asafoetida. Add the dal paste and fry until the colour changes. (It will be sticky, but won't look raw anymore. The mixture should not be as dry as the one made for paruppu usli.) Cool this mixture.

Make small balls of this mixture using a little rice flour to bind the mixture. (As demonstrated by Amma in the picture below.)


Drop these dumplings in boiling Milagu Rasam and cook for 5-7 minutes. Remove carefully.


To proceed, take a little rice on a plate. Place a dumpling on the rice and break it. Mix these two items thoroughly. Pour a little Milagu Kuzhambu on the side. Take a little bit of the rice and paruppu urundai mixture, dip it in the Milagu Kuzhambu and eat.

Some things in life have to be super special. A third "monthiversary" of your blog doesn't come everyday. And a 100th post comes but once. I didn't know when I set out on this journey that it would be so eventful. That S would show my food blog off with pride. That I would learn so much, that I'd even cook so much with vegetables and ingredients that intimidated me. But most of all, little did I know that I'd come across the most wonderful bunch of fellow food bloggers. People who are strangers one minute and friends the very next. People who have no idea who I am or where I come from, but have stood by me through these three months that would have otherwise been my worst. People who have given me confidence and encouragement to move ahead, tips to ensure my blogging efforts don't go waste, and above all else, the love and support to come back to this page every single day. You all know who you are and I thank all of you for being you.


Hugs!

Milagu Rasam (Pepper Rasam)


The second post in the "special" trilogy that began with
Milagu Kuzhambu. A special rasam for special times. To me, along with the other two, this trio is something I relish and during the most disturbing of times, I can sense that "all is truly well with the world".

But there's something floating in the rasam. What is that? That is my favourite Iyengar dish and you'll come to know what it is and why this trilogy is so special real soon.

Ingredients:

400 ml Dal Water (Use plain water if need be)
2 tbsp Cooked Dal
2-3 large Tomatoes, chopped (even halved)
1 tbsp Rasam Powder
1/4 tsp Asafoetida
1 tbsp Tamarind Paste
1 tsp Pepper, freshly ground
2 tsp Jaggery
Coriander Leaves for garnish
Salt to Taste

For the tempering:

1 tsp Oil or Ghee
1/4 tsp Mustard Seeds
7-8 Curry Leaves

In a vessel, take the dal water and dal and add the asafoetida, salt, pepper, jaggery and rasam powder. Add the tomatoes and tamarind paste of and bring to a boil. Simmer it for 4-5 minutes.

In a small kadhai, heat the oil or ghee, add the mustard seeds, and when they splutter, add the curry leaves.
Add this to the rasam. Garnish with chopped coriander leaves.

Relish this with rice. Or boil some cute little dumplings in this rasam that you can break over the rice and eat with Milagu Kuzhambu. You take your pick and decide!

Milagu Kuzhambu (Pepper Sambar)


Special occasions call for special things. Some exotic, some comforting, but all special. This is one dish that is part of a trio that is very special to me. When I was in Madras, living at home, paneer was a special thing. And then I moved up north and worked at GE. I got lunch everyday and dinner as well depending on my work schedule. And I got paneer almost everyday. After 6 months, I was so sick of it that when I rang home to tell my folks I was going to visit home, I remembered to tell Amma, "No paneer Ma, please."


So, what should she make to make it special? I told her to make one of my all time favourite Iyengar dish and this is something that forms a classic combination with that.


Ingredients:


1 tbsp Urad Dal

1 tsp Pepper Corns

A Handful of Curry Leaves

2-3 Red Chillies

1 tsp Oil

2 tbsp Tamarind Paste (more or less according to taste)

Salt to taste


For the tempering:


1/2 tsp Urad Dal

7-8 Curry Leaves

1 tsp Oil


Heat the oil and fry the urad dal. When it begins to turn brown, add the pepper, curry leaves, red chillies and take it off the stove.


Grind this to a paste in a mixer.


Add water to this paste and bring it to a boil after adding the tamarind paste and salt.


Heat the teaspoon of oil in a small kadhai and add the urad dal. When it turns brown, add the curry leaves and add to the kuzhambu.


I love this preparation with rice and paruppu usli or the other dish which I am about to post. The combination of these three things and rice is like taking a Thalys to heaven.

Wednesday, August 1, 2007

Tomato Pulao

Rice! I doubt anyone could have been happier with the selection of this ingredient for the Jihva for ingredients started by Indira of Mahanandi and hosted by Sharmi of Neivedyam.

I've not been much of a rice fan. I like variety and love rice only when it takes turns with noodles, pasta, soup, rotis etc arriving on my plate. Give me loads of any one thing only if you want to see/hear me crib for a long time to come.


But then, you can crib and cry all you want when someone else is cooking for you. I'd much rather eat rice than slave over the stove making rotis when I'm the one that has to do the cooking. At times like those, which has been everyday since I left home ten years ago, I can't agree more with Anita of A Mad Tea Party when she says, "Roti is such a job, I tell you. Eat rice instead and you have 12-15 minutes to watch TV, enjoy a drink. Or that cup of tea that you forgot all about!"


So, rice is my saviour. Saves me from toiling over the stove. Saves me the trouble of making 3 dishes. And it is so truly versatile. Whether you're eating it with sambar, rasam, curds, dal or egg curry, as biryani, risotto, paella, puliyodarai... or whether you're just mixing it with paruppu podi or any of the numerous podis your mom packed for you, or if you're enjoying it in its various forms such as idli, dosa, rice upma there is no escaping the impact that rice has on our lives. Anna, though is meant to mean food and hence the phrase "Annadata sukhi bhava", has come to mean rice.


This is something I made last week to clear my fridge of vegetables before we left for Manali. My cousin taught me this recipe when I was still in school and this comes in handy all the time.

Ingredients:

1 cup Basmati Rice
1 cup Mixed vegetables (I used cauliflower, beans, carrots, broccoli)
2 Onions, sliced
2 Tomatoes, chopped
1 tbsp Tomato Puree
1 Cardamom
2 Cloves
2" stick Cinnamon
1 tsp Ginger-Garlic paste
1 tsp Green chilli paste
1/4 tsp Turmeric Powder
1/2 tsp Chilli Powder
1 tbsp Oil
Salt to taste


Heat the oil in a pressure pan and fry the onions. When they turn translucent, add the cloves, cardamom and cinnamon stick. Fry for a minute before adding the ginger-garlic and chilli pastes. Fry this for about half a minute and add the chopped tomato, turmeric and chilli powder. Fry for 3-4 minutes. Add the tomato puree, rice, vegetables and saute for a minute and then add salt. Add 1 3/4 cups of hot water and cook for 1-2 whistles.


Enjoy this with some curd or raita. The nicest part about this pulao is that the tomato base ensures you don't need a side dish to go with it. And it tastes good even when cold.


This is my first official entry to the JFI: Rice hosted by Sharmi. My other celebrations of rice have been:


Rice Dishes:

Peas Pulao

Tayir Saadam (Curd Rice)

Tomato Rice

Jeera Rice

Spinach and Corn Rice

Coriander Rice

Coriander Rice Version 2

Mammidikaaya Pulihaara

Vangi Bhat


Items using rice in some form:

Dosa

Batat Phow

Sevai

Egg Dosa

Akki Roti

Tandlya Roti


I look forward to posting many more recipes in the coming weeks.